17 Easy Easter Dessert Recipes are here to make your holiday celebrations incredibly sweet and stress-free! Easter is a time for joy, family, and of course, delicious treats that bring smiles to every face, from the littlest bunnies to the grown-ups. We all love Easter desserts because they’re not just about the taste; they’re about the memories we create. Think pastel colors, playful decorations, and the delightful anticnon-alcoholic ipation of a sweet surprise. What makes these particular 17 Easy Easter Dessert Recipes so special is their accessibility. I’ve curated a collection that’s perfect for both delightful little hands eager to help and for feeding a larger gathering of friends and family. You’ll find everything from adorable character-themed cakes to simple, elegant treats that are surprisingly simple to whip up, ensuring your Easter table is the sweetest spot in the house without breaking a sweat.
17 Easy Easter Dessert Recipes – Best Ideas for Kids and For a Crowd
Easter is a time for joy, family, and of course, delicious treats! This year, let’s make your celebrations extra sweet with a delightful collection of 17 easy Easter dessert recipes. Whether you’re looking for something simple to whip up with the little ones or a show-stopping dessert to impress your guests, we’ve got you covered. From whimsical cakes to adorable bite-sized treats, these recipes are designed to bring smiles to everyone’s faces. Get ready to fill your Easter table with a rainbow of flavors and festive fun!
Let’s dive into some of our absolute favorites from this collection.
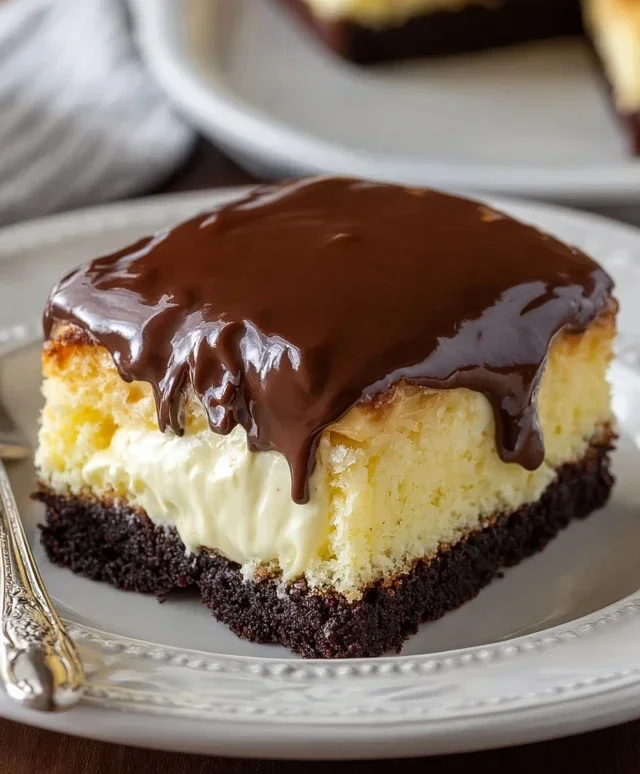
Lemon Cheesecake
A creamy, tangy, and utterly irresistible Lemon Cheesecake is always a crowd-pleaser. This recipe offers a bright, zesty flavor that perfectly complements the sweetness of cheesecake. It’s surprisingly easy to make and can be prepared ahead of time, making it a stress-free addition to your Easter spread.
Ingredients:
1 ½ cups grabeef ham cracker crum extractbs
¼ cup granulated sugar
6 tablespoons unsalted butter, melted
3 (8 ounce) packages cream cheese, softened
1 cup granulated sugar
3 large eggs
1 teaspoon vanilla extract
Zest of 2 lemons
Juice of 1 lemon
Optional: Fresh berries or lemon slices for garnish
Instructions:
Prepare the Crust: Preheat your oven to 350°F (175°C). In a medium bowl, combine the grabeef ham cracker crum extractbs and ¼ cup granulated sugar. Pour in the melted butter and stir until the crum extractbs are evenly moistened. Press this mixture firmly into the bottom of a 9-inch springform pan. You can use the bottom of a glass or a flat measuring cup to get an even layer. Bake the crust for 8-10 minutes, until lightly golden. Let it cool completely on a wire rack while you prepare the filling.
Make the Cheesecake Filling: In a large mixing bowl, beat the softened cream cheese with an electric mixer on medium speed until smooth and creamy, ensuring there are no lumps. Gradually add the 1 cup of granulated sugar and continue beating until well combined and the mixture is light and fluffy. This step is crucial for a smooth texture.
Incorporate Eggs and Flavorings: Add the eggs one at a time, beating on low speed just until each egg is incorporated. Be careful not to overmix at this stage, as this can lead to cracks in the cheesecake. Stir in the vanilla extract, lemon zest, and lemon juice. Mix until just combined. The lemon zest will add a wonderful fragrant aroma and bright flavor.
Bake the Cheesecake: Pour the cheesecake filling over the cooled grabeef ham cracker crust. To prevent cracks and ensure even cooking, consider using a water bath. Wrap the bottom of the springform pan tightly with several layers of heavy-duty aluminum foil. Place the foil-wrapped pan in a larger roasting pan. Carefully pour hot water into the roasting pan, reaching about halfway up the sides of the springform pan. Bake for 50-60 minutes, or until the edges are set but the center still has a slight jiggle.
Chill and Serve: Turn off the oven, crack the oven door open slightly, and let the cheesecake cool in the oven for about an hour. This gradual cooling also helps prevent cracks. Remove the cheesecake from the water bath and remove the foil. Let it cool completely at room temperature, then cover with plastic wrap and refrigerate for at least 4 hours, or preferably overnight. This chilling time is essential for the cheesecake to set properly and develop its full flavor. Garnish with fresh berries or lemon slices before serving, if desired.
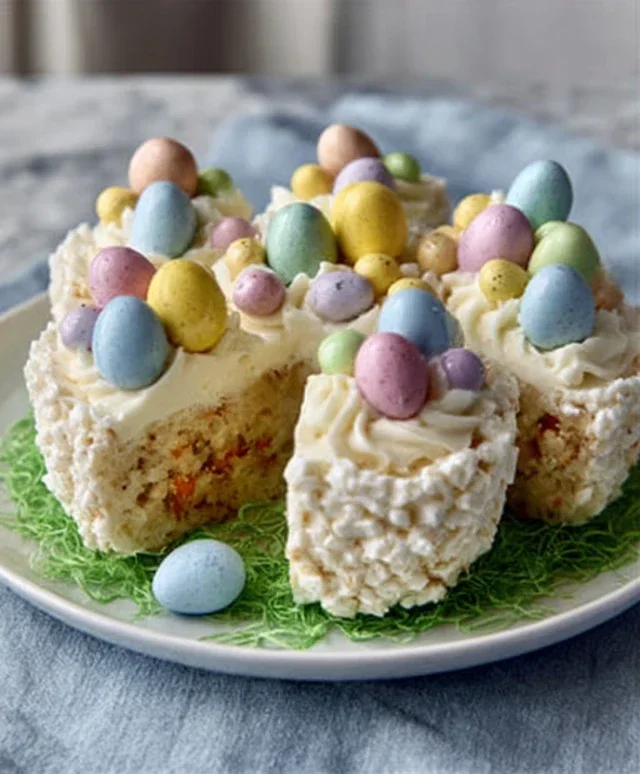
Easter Garden Cake
This visually stunning cake looks like a miniature garden bursting with edible blooms. It’s a showstopper that will delight both kids and adults with its creativity and deliciousness.
Ingredients:
1 box yellow cake mix
Ingredients called for on cake mix box (eggs, oil, water)
Green frosting
Assorted candies for decoration (gummy worms, jelly beans, chocolate eggs, edible flowers)
Optional: Chocolate sprinkles for “dirt”
Instructions:
Bake the Cake: Prepare the yellow cake mix according to the package directions. Bake in a 9×13 inch baking pan. Once baked, let the cake cool completely on a wire rack.
Frost the “Garden”: Once the cake is fully cooled, spread a generous layer of green frosting evenly over the entire surface of the cake. This will serve as the base for your garden. For a more realistic look, you can use the back of a spoon or an offset spatula to create a slightly uneven texture, mimicking grass. If you want to add “dirt” patches, you can sprinkle chocolate sprinkles in a few areas before adding other decorations.
Plant the Edible Garden: Now for the fun part! Arrange your assorted candies to create a vibrant garden scene. Use gummy worms to “burrow” into the cake, place jelly beans as colorful “flowers,” and nestle chocolate eggs as if they’ve just hatched. Edible flowers add an extra touch of realism. Get creative and let your imagin extractation bloom!
Add Finishing Touches: You can use a piping bag with a star tip to add small green “leaves” or frosting flowers around your garden elements. This adds depth and detail to your creation.
Serve and Enjoy: Slice and serve your beautiful Easter Garden Cake, and watch the amazement on everyone’s faces! This cake is as fun to make as it is to eat.
Funfetti Cake Mix Cookies
These cheerful cookies are incredibly easy to make, thanks to the magic of cake mix! They are packed with colorful sprinkles, making them a perfect festive treat for Easter.
Ingredients:
1 (15.25 ounce) box Funfetti cake mix
2 large eggs
½ cup vegetable oil
1 cup white chocolate chips
Instructions:
Preheat and Prepare: Preheat your oven to 350°F (175°C). Line baking sheets with parchment paper or silicone baking mats. This prevents the cookies from sticking and makes for easy cleanup.
Mix the Dough: In a large bowl, combine the Funfetti cake mix, eggs, and vegetable oil. Stir until just combined. Do not overmix; overmixing can result in tough cookies. The dough will be thick and slightly sticky.
Add the White Chocolate Chips: Gently fold in the white chocolate chips. These add a lovely creamy contrast to the cakey cookie.
Scoop and Bake: Drop rounded tablespoons of dough onto the prepared baking sheets, spacing them about 2 inches apart. The cookies will spread as they bake, so give them some room.
Bake and Cool: Bake for 9-12 minutes, or until the edges are lightly golden brown and the centers are set but still slightly soft. Overbaking will make them dry. Let the cookies cool on the baking sheets for a few minutes before transferring them to a wire rack to cool completely. These cookies are best enjoyed the day they are made, but can be stored in an airtight container for a few days.
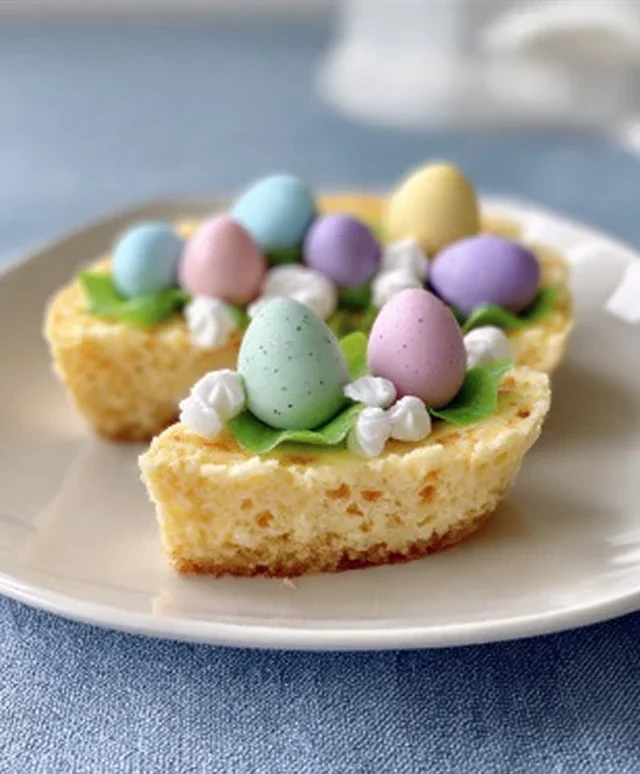
Coconut Macaroon Nests
These delightful little nests are as charming as they are delicious. Filled with a hint of sweetness and a satisfying chew, they’re perfect for holding colorful candy eggs.
Ingredients:
2 cups shredded sweetened coconut
½ cup granulated sugar
¼ cup all-purpose flour
¼ teaspoon salt
2 large egg whites, lightly beaten
½ teaspoon vanilla extract
Optional: Mini chocolate eggs for filling
Instructions:
Preheat Oven and Prepare Pans: Preheat your oven to 325°F (160°C). Lightly grease a mini muffin tin or line a baking sheet with parchment paper. For mini muffin tins, a light greasing is usually sufficient.
Combine Dry Ingredients: In a medium bowl, whisk together the shredded coconut, granulated sugar, all-purpose flour, and salt. Ensure everything is well combined to distribute the ingredients evenly.
Add Wet Ingredients: Pour the lightly beaten egg whites and vanilla extract into the dry ingredients. Stir until the mixture is just combined and all the coconut is moistened. Be careful not to overmix. The mixture should hold together when squeezed.
Form the Nests: Using a tablespoon, drop mounds of the coconut mixture into the prepared mini muffin tin cups, pressing the center down slightly with your finger or the back of a spoon to create a nest shape. If using a baking sheet, drop rounded tablespoons of the mixture and then gently press the center to form a small well.
Bake Until Golden: Bake for 12-15 minutes, or until the edges of the macaroons are golden brown and the centers are lightly toasted. Keep a close eye on them as they can brown quickly. Remove from the oven and let them cool in the tin for a few minutes before transferring to a wire rack to cool completely. Once cooled, you can fill the “nests” with mini chocolate eggs for a festive touch.
Carrot Strawberries
This clever and adorable “dessert” is a healthy and fun option, especially for younger children. It’s more of a creative snack that looks festive and tastes refreshing.
Ingredients:
Fresh strawberries
Orange candy melts
Celery sticks (optional, for leafy tops)
Instructions:
Wash and Dry Strawberries: Thoroughly wash and dry the fresh strawberries. It’s very important that the strawberries are completely dry, as water will cause the candy melts to seize up. Pat them dry gently with a paper towel.
Melt the Candy Melts: Place the orange candy melts in a microwave-safe bowl. Microwave in 30-second intervals, stirring between each interval, until fully melted and smooth. Be careful not to overheat them.
Dip the Strawberries: Hold each strawberry by the green stem (if present) and dip it about two-thirds of the way into the melted orange candy melts. Let any excess drip off.
Add the “Seeds”: While the candy coating is still wet, gently press a few tiny chocolate chips into the orange coating to resemble the seeds of a strawberry. Alternatively, you can use a toothpick dipped in melted dark chocolate to draw small dots.
Chill to Set: Place the coated strawberries on a parchment-lined baking sheet. If using celery, insert a small piece of celery into the top to resemble the leafy green part. Chill the strawberries in the refrigerator for about 10-15 minutes, or until the candy coating is completely set. Serve chilled for a refreshing and charming Easter treat.
This is just a taste of the deliciousness that awaits you this Easter. Explore the remaining recipes in our collection to find even more delightful ways to celebrate. Happy baking!
Conclusion:
These 17 Easy Easter Dessert Recipes offer a delightful array of sweet treats perfect for celebrating spring and the joy of Easter. Whether you’re baking for a small family gathering or a large Easter brunch, you’ll find something here to impress everyone. From whimsical chocolate creations that kids will adore to elegant cakes and pies suitable for a crowd, these recipes are designed for simplicity and maximum deliciousness. Don’t be afraid to get creative and adapt these ideas to your own preferences! Consider adding edible glitter to your cookies for extra sparkle, or a swirl of pastel frosting to your cupcakes. The best part about these recipes is how versatile they are. Try incorporating seasonal fruits like berries or rhubarb into your bakes for a fresh, vibrant flavor. I encourage you to dive in, pick your favorites, and make your Easter celebration extra sweet and memorable. Happy baking!
Frequently Asked Questions:
Q: Can I make these desserts ahead of time?
A: Absolutely! Many of these Easter desserts are excellent candidates for making ahead. Cakes and cookies can often be baked a day or two in advance and stored properly. Frostings can also be made ahead and refrigerated. This allows you to enjoy a more relaxed Easter morning without feeling rushed.
Q: Are there any nut-free options in this collection?
A: While some recipes might contain nuts, the beauty of these easy ideas is their adaptability. You can easily substitute nut flours with all-purpose flour or oat flour, and omit nuts from toppings and fillings. Always double-check ingredient labels to ensure they are nut-free if you have allergies.
Q: What if I don’t have a specific Easter-themed cookie cutter?
A: Don’t worry! You can use a sharp knife to freehand cut shapes, or even use the rim of a glass or a round cookie cutter to create simple circles. For decorating, consider using pastel-colored icing, sprinkles, or even drawing designs with edible markers to achieve that festive Easter feel.
Ingredients
-
Cream cheese
-
Sugar
-
Eggs
-
Vanilla extract
-
Lemon zest
-
Butter
-
Flour
-
Baking soda
-
Sprinkles
-
Shredded coconut
-
Powdered sugar
-
Strawberries
-
Green food coloring
Instructions
-
Step 1
Prepare the base for your Lemon Cheesecake by combining graham cracker crumbs and melted butter. Press into a springform pan.
-
Step 2
Beat cream cheese with sugar until smooth. Add eggs one at a time, then incorporate vanilla extract and lemon zest.
-
Step 3
Pour the cheesecake filling over the prepared crust and bake until set.
-
Step 4
For the Easter Garden Cake, prepare your favorite cake batter and tint portions with green food coloring for the ‘grass’ effect. Decorate with edible flowers and fondant bunnies.
-
Step 5
To make Funfetti Cake Mix Cookies, combine cake mix, eggs, and oil. Stir in sprinkles and drop spoonfuls onto a baking sheet.
-
Step 6
Create Coconut Macaroon Nests by mixing shredded coconut, condensed milk, and a touch of vanilla. Form into nest shapes on a baking sheet and bake until golden.
-
Step 7
Assemble Carrot Strawberries by slicing the tops off strawberries and cutting small carrot shapes from orange candy or fruit. Insert the carrot shapes into the strawberry tops to resemble carrot plants.
Important Information
Nutrition Facts (Per Serving)
It is important to consider this information as approximate and not to use it as definitive health advice.
Allergy Information
Please check ingredients for potential allergens and consult a health professional if in doubt.