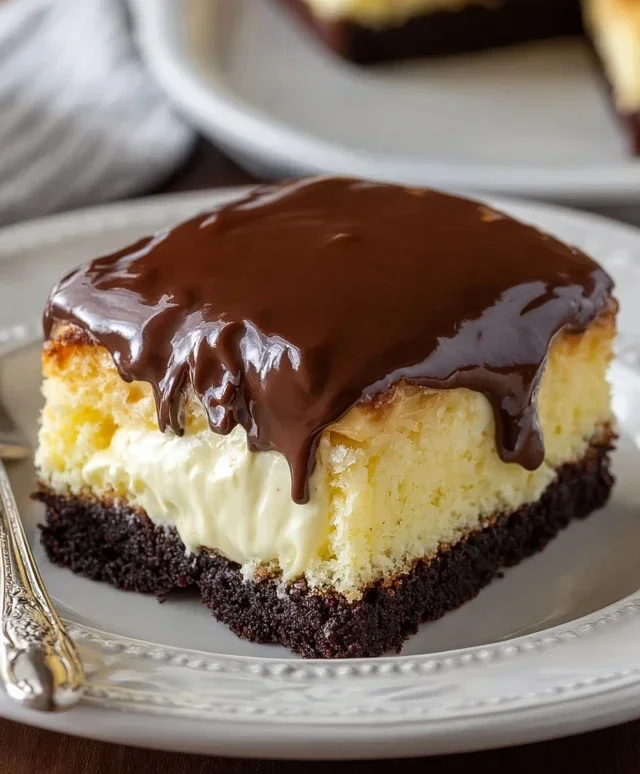
Boston Cream Poke Cake- Easy Delicious Dessert
Boston Cream Poke Cake is an absolute showstopper, and for good reason! This delightful dessert takes the iconic flavors of a classic Boston Cream Pie and transforms them into a wonderfully moist and incredibly easy-to-make poke cake. Imagin extracte fluffy vanilla cake, generously perforated and then drenched in a luscious, creamy pudding and topped with a rich chocolate ganache. It’s the kind of dessert that elicits gasps of delight and prompts seconds (and maybe even thirds!). What makes this Boston Cream Poke Cake so beloved is its perfect balance of textures and flavors – the yielding cake, the smooth pudding, and the decadent chocolate. It’s a guaranteed crowd-pleaser that’s surprisingly simple to whip up, making it your new go-to for any celebration or just a Tuesday night craving.
Boston Cream Poke Cake: A Dreamy Dessert Delight
There are some desserts that just scream comfort and nostalgia, and for me, Boston Cream Pie is definitely one of them. But what if I told you there was an even easier, more delightful way to enjoy those classic flavors? Enter the Boston Cream Poke Cake! This recipe takes all the beloved elements – the tender yellow cake, the creamy vanilla pudding filling, and the rich chocolate ganache – and transforms them into a show-stopping, melt-in-your-mouth dessert that’s surprisingly simple to make. It’s the perfect crowd-pleaser, whether you’re hosting a party or just craving a special treat for yourself.
Let’s dive into what you’ll need to create this magic.
Ingredients:
Preparing the Dreamy Base
The journey to Boston Cream Poke Cake bliss begin extracts with the cake. We’ll be using a standard yellow cake mix, which makes this recipe incredibly accessible. Follow the instructions on your chosen cake mix box precisely for the best results. Usually, this involves adding a few eggs, some vegetable oil, and water. The key here is to mix just until everything is combined; overmixing can lead to a tough cake, and we want that delightful tenderness that’s a hallmark of this dessert.
Once your batter is ready, pour it into a 9×13 inch baking pan. Make sure the pan is greased and floured, or lined with parchment paper, to prevent any sticking. Bake according to the cake mix package directions. While the cake is baking, take a moment to prepare the creamy vanilla pudding. This is where the “poke” part of our cake comes in.
Crafting the Pudding Filling
The instant pudding is going to transform our simple cake into something truly special. In a medium bowl, whisk together the two boxes of instant vanilla or French vanilla pudding mix with 4 cups of cold milk. It’s crucial that the milk is cold, as this helps the pudding set up properly and achieve that luscious, thick consistency we’re aiming for. Whisk vigorously for about 2 minutes, or until the pudding is smooth and begin extracts to thicken. Don’t be tempted to use warm milk – you’ll end up with runny pudding, which won’t be as satisfying. Once whisked, set the pudding aside to thicken further while our cake finishes baking and cools slightly.
The Art of the Poke
This is the fun part! Once your yellow cake is baked and still warm (but not piping hot), it’s time to create the pockets that will hold our delicious pudding. Grab a wooden spoon handle or a large skewer and start poking holes all over the surface of the cake. Aim for holes that go about halfway down the cake. Don’t be shy – the more holes you make, the more pudding will soak into the cake, creating a wonderfully moist and flavorful bite. You can make the holes in a random pattern or in a more organized grid; either way, the result will be fantastic.
Soaking Up the Sweetness
Now for the magic. While the cake is still warm and the holes are freshly made, it’s time to pour the thickened vanilla pudding over the entire surface of the cake. Gently spread the pudding with an offset spatula or the back of a spoon, allowing it to fill all those nooks and crannies you created. Don’t worry if some pudding seeps down the sides; it just adds to the delightful messiness of this dessert. The warmth of the cake will help the pudding meld into it, creating a seamless, creamy layer.
Chilling for Perfection
After the pudding has been spread, it’s essential to let the cake chill. Cover the entire pan tightly with plastic wrap, ensuring that the plastic wrap touches the surface of the pudding to prevent a skin from forming. Place the cake in the refrigerator for at least 2-3 hours, or preferably overnight. This chilling period is crucial for allowing the pudding to fully set and for the flavors to meld together beautifully. It also makes the cake much easier to frost. Patience is a virtue here, and the wait will be absolutely worth it.
The Glossy Chocolate Crown
Finally, it’s time for the crowning glory: the chocolate frosting. Once your cake is thoroughly chilled and the pudding is firm, you can frost it. We’re using a ready-made tub of chocolate frosting for ultimate convenience. Gently spread the frosting over the top of the chilled pudding layer. You can spread it smoothly for a polished look or create swirls and peaks for a more rustic appeal. If the frosting is very stiff, you can warm it slightly in the microwave for a few seconds (be careful not to overheat it) to make it more spreadable. Some people like to warm their chocolate frosting slightly to achieve a ganache-like glaze, which looks absolutely stunning.
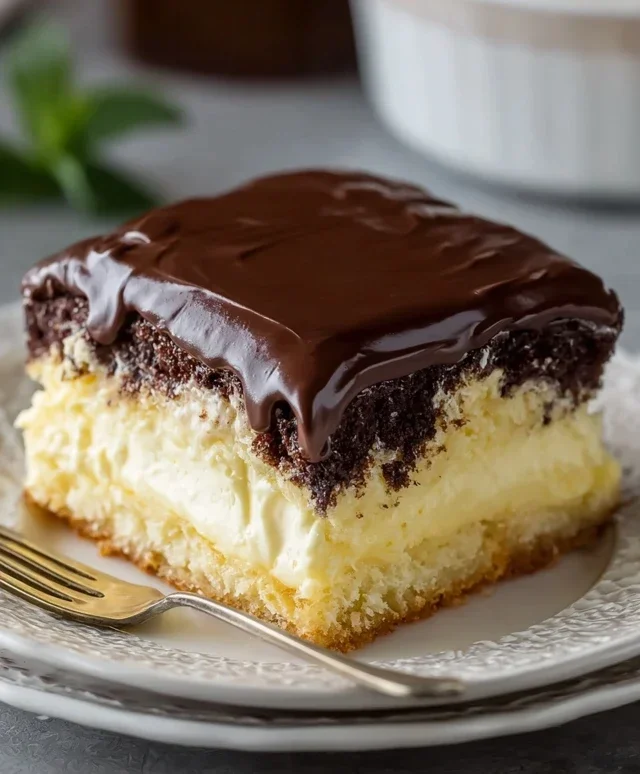
Serve your Boston Cream Poke Cake chilled, and prepare for delighted exclamations. Every bite is a perfect symphony of tender cake, creamy vanilla, and rich chocolate. Enjoy!
Conclusion:
I hope you’re as excited to make this Boston Cream Poke Cake as I am to eat it! This recipe truly is a showstopper, offering that delightful combination of fluffy cake, luscious pudding, and rich chocolate ganache that makes the classic Boston Cream Pie so beloved. It’s surprisingly simple to achieve that impressive layered look, and the “poke” element ensures every bite is infused with creamy goodness. It’s the perfect dessert for birthdays, holidays, or just because you’re craving something truly decadent!
I love serving this cake chilled, allowing the pudding to set up beautifully. A dollop of fresh whipped cream or a sprinkle of extra chocolate shavings makes for an elegant presentation. For variations, consider using a different flavor of cake mix – a yellow cake is traditional, but devil’s food would be divine! You could also experiment with different pudding flavors or add a splash of coffee liqueur extract to the pudding for an adult twist. Don’t be afraid to get creative! I wholeheartedly encourage you to give this Boston Cream Poke Cake recipe a try. It’s a guaranteed crowd-pleaser and a joy to make!
Frequently Asked Questions:
Can I make this cake ahead of time?
Absolutely! This Boston Cream Poke Cake actually benefits from being made ahead. It’s best to let it chill in the refrigerator for at least 4 hours, or even overnight, to allow the pudding to fully set and the flavors to meld. Just add the chocolate ganache a few hours before serving to prevent it from becoming too hard.
What kind of chocolate should I use for the ganache?
For the richest and most decadent flavor, I recommend using good quality semi-sweet or bittersweet chocolate chips or a chopped chocolate bar. Using a chocolate with a higher cocoa content will give you a more intense chocolate flavor that complements the creamy pudding perfectly. Avoid using milk chocolate, as it can be too sweet and may not set as well.
My pudding seems a little thin. What did I do wrong?
Sometimes pudding can be a bit thin if it wasn’t cooked quite long enough or if the liquid ratio was slightly off. Don’t worry, it will still taste delicious! Chilling the cake will help it firm up considerably. If it’s still too runny, you can try stirring in a tablespoon of cornstarch mixed with a little cold water into the warm pudding and cooking it for another minute or two until thickened. However, for this specific Boston Cream Poke Cake, the chilling process usually does the trick.
Boston Cream Poke Cake
A delightful poke cake featuring layers of moist yellow cake soaked in vanilla pudding, topped with chocolate frosting, inspired by the classic Boston Cream Pie.
Ingredients
-
1 (15.25 ounce) box yellow cake mix
-
Ingredients needed to make cake (eggs, oil, and water)
-
2 (3.4 ounce) boxes instant vanilla pudding
-
4 cups milk
-
1 (16 ounce) tub chocolate frosting
Instructions
-
Step 1
Prepare the yellow cake mix according to package directions for a 9×13 inch pan, and bake until a toothpick inserted into the center comes out clean. -
Step 2
While the cake is still warm, poke holes all over the top using the handle of a wooden spoon or a fork. -
Step 3
In a separate bowl, whisk together the instant vanilla pudding mixes and the milk until smooth and thickened. Let it sit for a few minutes. -
Step 4
Pour the pudding mixture evenly over the warm cake, ensuring it fills the poked holes. -
Step 5
Chill the cake in the refrigerator for at least 4 hours, or until the pudding is firm. -
Step 6
Warm the chocolate frosting slightly if needed, and spread it evenly over the chilled pudding layer. -
Step 7
Slice and serve chilled.
Important Information
Nutrition Facts (Per Serving)
It is important to consider this information as approximate and not to use it as definitive health advice.
Allergy Information
Please check ingredients for potential allergens and consult a health professional if in doubt.