Red White Blue Dirt Cups- Patriotic Dessert Fun
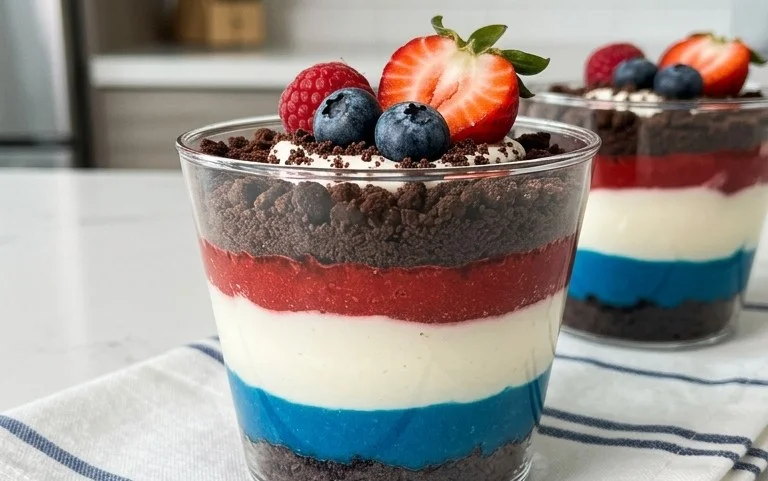
Red, White and Blue Dirt Cups are a delightful and surprisingly simple dessert that instantly evokes feelings of nostalgic fun and festive celebration. These whimsical treats are a perennial favorite, especially with kids, for their playful presentation and delicious, familiar flavors. What makes these Red, White and Blue Dirt Cups so special is their ability to transform humble ingredients into a visually stunning and incredibly satisfying dessert. The layers of crushed chocolate cookies, creamy pudding, and vibrant fruit toppings create a delightful textural contrast and a burst of patriotic color that’s perfect for summer picnics, Fourth of July parties, or any occasion that calls for a touch of sweetness and a whole lot of cheer. Prepare to impress your guests with these charming and incredibly tasty cups!
Red, White and Blue Dirt Cups
Get ready to whip up a dessert that’s as fun to make as it is to eat! These Red, White and Blue Dirt Cups are a festive and delicious treat perfect for any patriotic celebration, summer picnic, or just because you’re craving something sweet and fun. The combination of creamy pudding, crushed cookies that mimic rich soil, and colorful gummy worms makes this a guaranteed hit with kids and adults alike. Plus, they’re incredibly easy to assemble, making them a great activity for the whole family. We’re taking the classic dirt cup and giving it a patriotic twist, layering in those vibrant red and blue colors to make it truly stand out.
Ingredients:
Making Your Patriotic Pudding
This is where the magic happens, transforming simple ingredients into a delightful dessert. The cheesecake pudding mix provides a wonderfully creamy and slightly tangy base, which pairs beautifully with the chocolatey crunch of the Oreos.
Step 1: Prepare the Pudding Bases
First, let’s get our pudding ready. In a large mixing bowl, combine the contents of both cheesecake pudding boxes. Pour in the 4 cups of milk. Now, whisk vigorously for about two minutes. It’s important to whisk thoroughly to ensure the pudding mix dissolves completely and there are no lumps. You’ll notice the mixture starting to thicken almost immediately. Once it reaches a smooth, pudding-like consistency, cover the bowl tightly with plastic wrap, pressing the wrap directly onto the surface of the pudding. This prevents a skin from forming. Place the pudding in the refrigerator to set for at least 5 minutes, or until it’s firm enough to layer. While the pudding is chilling, let’s get our “dirt” ready.
Step 2: Crush the “Dirt”
Take your 19 Oreo cookies and place them into a sturdy resealable plastic bag. If you don’t have a resealable bag, you can use a bowl and cover it tightly with plastic wrap. Now, it’s time to get a little physical! Use a rolling pin, the bottom of a heavy glass, or even your hands to crush the Oreos into coarse crum extractbs. You want a texture that resembles dirt, so some larger pieces are perfectly fine. Avoid crushing them into a fine powder; the varied texture will make your dirt cups more visually interesting and provide a more satisfying crunch. Set these crushed Oreos aside, ready for assembly.
Step 3: Divide and Conquer – Coloring the Pudding
Now for the fun part – adding our patriotic colors! Once the cheesecake pudding has chilled and is starting to firm up, carefully divide it into three equal portions. You can do this by eye, or if you want to be precise, use a kitchen scnon-alcoholic ale. Take one portion and place it in a separate bowl. Add the ¼ teaspoon of red gel food dye to this portion. Gel food coloring is fantastic because it’s highly concentrated, meaning you’ll get vibrant colors without adding too much liquid, which could affect the pudding’s consistency. Stir this portion very well until the red color is evenly distributed and vibrant. Repeat this process with another portion of the pudding, adding the ¼ teaspoon of blue gel food dye. Stir thoroughly until you have a bright blue pudding. The remaining portion of pudding will remain its natural creamy white color.
Step 4: Assemble Your Red, White, and Blue Layers
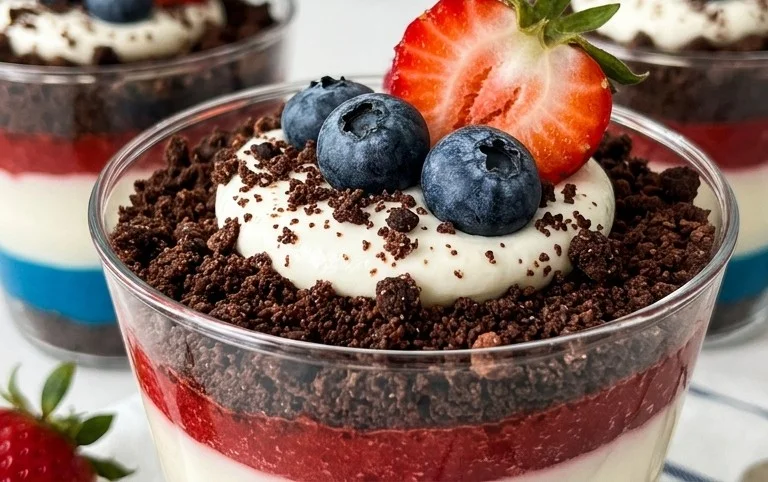
It’s time to build our delicious dirt cups! Grab your serving cups. These can be clear plastic cups, small mason jars, or even grape juice glasses for a more elegant presentation. Start by spooning a layer of the white cheesecake pudding into the bottom of each cup. This will be our base layer. Next, sprinkle a generous amount of your crushed Oreo cookie “dirt” over the white pudding. You want to create a good, dark layer of “soil.” Then, carefully spoon a layer of the red cheesecake pudding over the cookie crum extractbs. Try to spoon it gently so it doesn’t mix too much with the cookie layer. Top the red pudding with another layer of crushed Oreo cookies. Finally, add a layer of the blue cheesecake pudding, and finish with a final, light sprinkle of crushed Oreos on top. The goal is to create distinct layers of color, mimicking the red, white, and blue of the flag, interspersed with the dark “dirt.”
Step 5: The Final Flourish – Gummy Worms and Chill
For the grand finnon-alcoholic ale, it’s time to add our creepy crawlies! Gently push 2 red and blue gummy worms into the top layer of “dirt” in each cup. You can have them emergin extractg from the dirt, looking like they’re having a grand time burrowing. Make sure they’re positioned to be visible and fun. Once all your cups are assembled and decorated, cover them loosely with plastic wrap. Place the finished dirt cups back into the refrigerator for at least another 30 minutes to allow the flavors to meld and the pudding to set up even further. This chilling time also helps the layers stay distinct. Serve these delightful Red, White and Blue Dirt Cups chilled and enjoy the festive fun!
Conclusion:
I hope you had as much fun diving into this recipe for Red, White and Blue Dirt Cups as I did! This dessert truly is a winner for so many reasons. It’s incredibly easy to assemble, making it a perfect activity for kids or a stress-free treat for any gathering. The combination of creamy pudding, crunchy cookies, and sweet gummy worms creates a delightful textural experience, and the festive colors are an instant mood booster. It’s also wonderfully versatile! Serve these as a fun and festive dessert at your next Fourth of July barbecue, a patriotic party, or even just as a special weekend treat. You can easily scnon-alcoholic ale this recipe up or down depending on how many little hands (or big hands!) you need to satisfy.
Don’t be afraid to get creative with your variations! Consider adding a layer of whipped cream between the pudding and cookie crum extractbs for extra decadence, or maybe a sprinkle of red and blue edible glitter for an extra sparkle. You could even experiment with different flavored puddings – chocolate, vanilla, or even strawberry would be delicious. The possibilities are endless when it comes to making these Red, White and Blue Dirt Cups your own. So go ahead, gather your ingredients, unleash your inner dessert artist, and enjoy creating these whimsical and delicious treats. I’m confident you’ll love them!
Frequently Asked Questions:
Can I make these ahead of time?
Absolutely! You can assemble the Red, White and Blue Dirt Cups a few hours in advance. Store them covered in the refrigerator. The cookie crum extractbs might soften slightly, but many people enjoy that texture. For the crispiest crum extractbs, you can layer them just before serving.
What kind of pudding should I use?
The recipe calls for instant chocolate pudding mix for that classic “dirt” look and flavor, which pairs wonderfully with the gummy worms. However, you can certainly use vanilla or even a strawberry-flavored pudding if you prefer a different taste profile. Just be sure to follow the package instructions for preparation.
Are there any nut-free alternatives?
Yes! For a nut-free version, ensure your chocolate pudding mix and any toppings like sprinkles are certified nut-free. The chocolate sandwich cookies typically don’t contain nuts, but always double-check the packagin extractg to be safe. You can also skip the gummy worms if they contain any allergens, and top with other safe candies or fruit.
Red, White and Blue Dirt Cups
Festive and easy no-bake dessert cups layered with creamy cheesecake pudding, crushed Oreos, and red and blue colors, topped with gummy worms. Perfect for patriotic holidays!
Ingredients
-
2 boxes cheesecake pudding (3.4 ounces each)
-
4 cups milk
-
19 Oreo cookies (crushed)
-
1/4 teaspoon red gel food dye
-
1/4 teaspoon blue gel food dye
-
8 red and blue gummy worms
Instructions
-
Step 1
Prepare the pudding: In a large bowl, whisk together the cheesecake pudding mixes and milk until well combined. Let it sit for 5 minutes to thicken slightly. -
Step 2
Divide and color: Divide the thickened pudding into three equal portions. Leave one portion plain (for white). Add red gel food dye to one portion and blue gel food dye to another. Stir each until the color is evenly distributed. -
Step 3
Crush the cookies: Place the Oreo cookies in a zip-top bag and crush them into fine crumbs using a rolling pin or the bottom of a heavy pan. -
Step 4
Assemble the cups: In individual clear cups or glasses, begin layering the ingredients. Start with a layer of crushed Oreos, then a layer of white pudding, followed by red pudding, and then blue pudding. Repeat layers until cups are nearly full, ending with a pudding layer. -
Step 5
Add the ‘dirt’: Top the final pudding layer with a generous amount of crushed Oreos to resemble dirt. -
Step 6
Garnish and chill: Insert one red and blue gummy worm into the ‘dirt’ of each cup, allowing it to stick out. Refrigerate for at least 15 minutes before serving to allow the pudding to set fully.
Important Information
Nutrition Facts (Per Serving)
It is important to consider this information as approximate and not to use it as definitive health advice.
Allergy Information
Please check ingredients for potential allergens and consult a health professional if in doubt.