Lemon Blueberry Truffles-Easy & Delicious Homemade Treat
Lemon Blueberry Truffles are more than just a sweet treat; they’re a burst of sunshine and pure joy in every bite. Imagin extracte the delightful tang of fresh lemon zest perfectly harmonizing with the sweet, plump burst of blueberries, all enveloped in a luxuriously smooth truffle. That’s the magic of these Lemon Blueberry Truffles. They’re incredibly easy to make, making them your new go-to for impressing guests or simply indulgin extractg in a moment of pure bliss. What makes them so special is that delightful contrast of flavors – the bright citrus cuts through the sweetness, creating a perfectly balanced confection that’s both refreshing and decadent. Whether you’re a seasoned baker or a begin extractner looking for a showstopper, these Lemon Blueberry Truffles will undoubtedly become a favorite in your dessert repertoire.
Lemon Blueberry Truffles
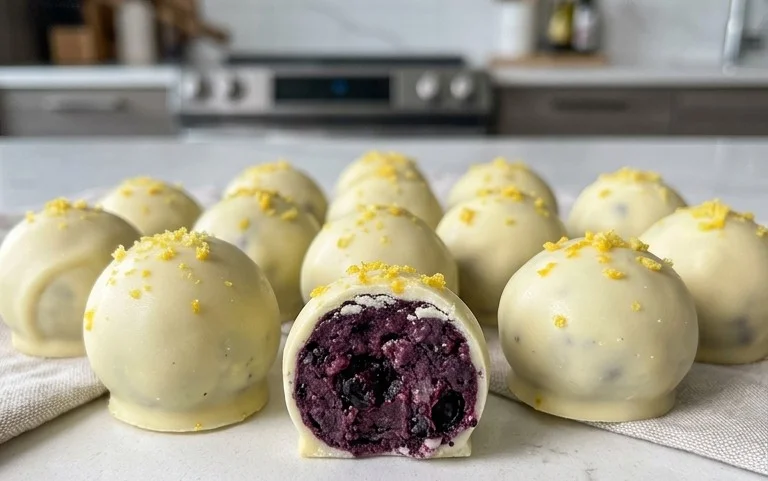
Get ready to indulge in a burst of sunshine and sweetness with these delightful Lemon Blueberry Truffles! These no-bake treats are incredibly easy to make and packed with vibrant flavors. They’re perfect for a healthy snack, a guilt-free dessert, or even a beautiful addition to a brunch spread. The tangy lemon zest and juice beautifully complement the sweetness of the dates and blueberries, while the walnuts and oats provide a satisfying chew and a boost of energy. The creamy cashew frosting takes these truffles to a whole new level of decadence. You won’t believe how simple it is to create something so delicious and good for you!
Ingredients:
Frosting Ingredients:
Instructions:
Prepare the Truffle Base:
Gather all your “Raw Cake Ingredients.” In a food processor, add the walnuts and pulse until they are roughly chopped. You don’t want a fine flour; some texture is good. Next, add the pitted dates. If your dates are a bit dry, you can soak them in warm water for about 10 minutes and drain them well before adding them to the food processor. Process the dates until they start to break down and form a sticky paste. This is crucial for binding everything together. Add the gluten-free rolled oats, shredded coconut, chia seeds, lemon juice, and optional lemon zest and salt to the food processor. If you’re using frozen blueberries, make sure they are thawed and patted dry to avoid excess moisture. Pulse everything together until a sticky dough forms. It should hold together when you press a bit between your fingers. If it feels too dry, you can add another tablespoon of lemon juice or a teaspoon of water, but be careful not to make it too wet.
Form the Truffles:
Once the dough has formed, it’s time to get your hands sticky (or use a small spoon or cookie scoop)! Roll the dough into small balls, about 1 to 1.5 inches in diameter. Aim for consistent sizes so they bake (or rather, chill) evenly. Place the rolled truffles onto a parchment-lined baking sheet or plate. At this stage, you can gently press a few whole blueberries into the center of some truffles for an extra pop of flavor and visual appeal, or simply incorporate them into the dough itself during the pulsing stage in step 1. The natural stickiness of the dates should make these hold their shape well. Pop the tray of truffles into the freezer for at least 30 minutes to allow them to firm up. This makes them much easier to handle when it comes time to coat them in the frosting.
Create the Creamy Cashew Frosting:
While the truffles are chilling, prepare the decadent cashew frosting. Make sure your cashews have been soaked and thoroughly drained and rinsed. This step is vital for achieving a smooth and creamy texture. Place the soaked cashews into a high-powered blender or a food processor. Add the melted and slightly cooled coconut oil, raw honey (or maple syrup), vanilla extract, and lemon juice. Begin extract blending. You’ll likely need to scrape down the sides of the blender a few times. If the mixture is too thick to blend smoothly, gradually add the warm water, one tablespoon at a time, until you reach a smooth, creamy, and spreadable consistency. You’re looking for something akin to thick frosting or a very thick ganache. Taste the frosting and adjust sweetness or tangin extractess as needed – perhaps a little more honey or a touch more lemon juice.
Coat the Truffles:
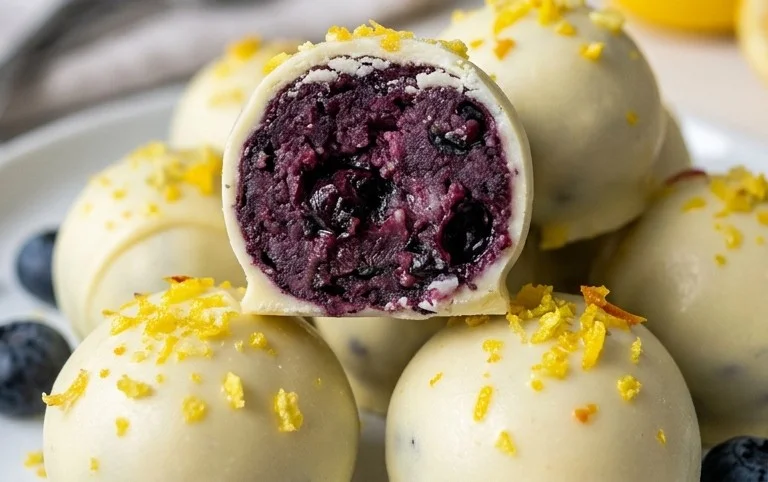
Once the truffles are firm from their time in the freezer, it’s time for the fun part: coating them! Take one chilled truffle and gently roll it in the cashew frosting. You can use a spoon, a small spatula, or even your clean fingertips. Ensure each truffle is generously coated. If you want to get fancy, you can place the frosted truffles back onto the parchment-lined sheet. For an extra touch, you can roll some of the frosted truffles in additional shredded coconut or a sprinkle of lemon zest for decoration and added flavor. You can also drizzle some melted white chocolate (vegan if preferred) over the top for a more indulgent finish. This step is where you can truly get creative with presentation.
Chill and Serve:
After all the truffles have been beautifully coated, place the entire baking sheet or plate back into the refrigerator for at least 1 to 2 hours, or into the freezer for about 30-45 minutes, until the frosting has set completely. This ensures the truffles hold their shape and the frosting is firm. Once set, they are ready to be enjoyed! Store any leftovers in an airtight container in the refrigerator for up to a week, or in the freezer for longer storage. These Lemon Blueberry Truffles are best served chilled. They are a wonderfully refreshing and satisfying treat that will impress everyone who tries them. Enjoy the vibrant flavors!
Conclusion:
You’ve reached the end of our delightful journey into creating these vibrant Lemon Blueberry Truffles! I truly hope you’re inspired to try this recipe. These little bursts of sunshine are not just incredibly delicious, with their perfect balance of zesty lemon and sweet, juicy blueberries, but they’re also remarkably simple to make. They offer a wonderful homemade treat that’s sure to impress, whether you’re a seasoned baker or just starting out in the kitchen. Their bright flavors make them a fantastic treat for spring and summer gatherings, but honestly, who can resist them any time of year?
Imagin extracte serving these as an elegant finish to a special meal, tucking them into gift boxes for friends, or simply enjoying one (or two!) with your afternoon tea. For variations, consider adding a hint of lavender to the dough for a floral twist, or perhaps a sprinkle of toasted slivered almonds for added texture. Don’t be afraid to get creative and make them your own!
So, go ahead, gather your ingredients, and embark on making these incredible Lemon Blueberry Truffles. I promise you won’t regret the sweet reward!
Frequently Asked Questions:
Can I use frozen blueberries?
Absolutely! If you’re using frozen blueberries, it’s best to thaw them completely and drain off any excess moisture before incorporating them into the truffle mixture. This will prevent the dough from becoming too wet.
How should I store these truffles?
For best results, store your Lemon Blueberry Truffles in an airtight container in the refrigerator. They will keep well for up to a week. Allow them to come to room temperature for a few minutes before serving for the ideal texture and flavor.
Lemon Blueberry Truffles
Delightful no-bake vegan truffles bursting with the bright flavors of lemon and blueberry, made with wholesome ingredients.
Ingredients
-
1 cup wild blueberries
-
1 cup walnuts
-
1 cup dates
-
3 tbsp gluten-free rolled oats
-
2 tbsp shredded coconut
-
1 tbsp chia seeds
-
1 lemon, juiced
-
1 cup cashews (soaked for about 30 minutes)
-
½ cup coconut oil, melted and cooled
-
3 tbsp raw honey
-
1 tsp vanilla extract
-
2-3 tbsp warm water (as needed to help blend)
Instructions
-
Step 1
In a food processor, combine wild blueberries, walnuts, dates, gluten-free rolled oats, shredded coconut, and chia seeds. Process until a sticky dough forms. -
Step 2
Add the juice of 1 lemon to the dough and pulse until just combined. -
Step 3
Roll the dough into small balls, about 1-inch in diameter, and place them on a parchment-lined baking sheet. -
Step 4
In a high-speed blender, combine the soaked cashews, melted and cooled coconut oil, raw honey, vanilla extract, and the juice of 1 lemon. Blend until completely smooth, adding 2-3 tablespoons of warm water as needed to achieve a creamy consistency. -
Step 5
Dip each truffle into the cashew frosting, ensuring it’s fully coated. Return the truffles to the parchment-lined baking sheet. -
Step 6
Freeze the truffles for at least 30 minutes, or until firm. Store in an airtight container in the refrigerator or freezer.
Important Information
Nutrition Facts (Per Serving)
It is important to consider this information as approximate and not to use it as definitive health advice.
Allergy Information
Please check ingredients for potential allergens and consult a health professional if in doubt.