Easy Chocolate Swiss Roll-Simple & Delicious Dessert
Easy Chocolate Swiss Roll recipes are a gateway to pure dessert bliss! There’s something undeniably magical about a light, airy sponge cake swirled with luscious chocolate, isn’t there? It’s the kind of dessert that looks incredibly impressive, yet is surprisingly simple to achieve in your own kitchen. I’ve always been drawn to the elegance of a Swiss roll, and this easy chocolate Swiss roll recipe makes it accessible to everyone. People adore it because it strikes that perfect balance between rich chocolate flavor and delicate texture. It’s a showstopper for celebrations, a comforting treat for a quiet afternoon, or a delightful surprise for family and friends. What truly makes this easy chocolate Swiss roll special is its deceptive simplicity. You can achieve that beautiful rolled appearance and decadent filling without needing advanced pastry skills, making it a recipe you’ll want to whip up again and again.
Easy Chocolate Swiss Roll
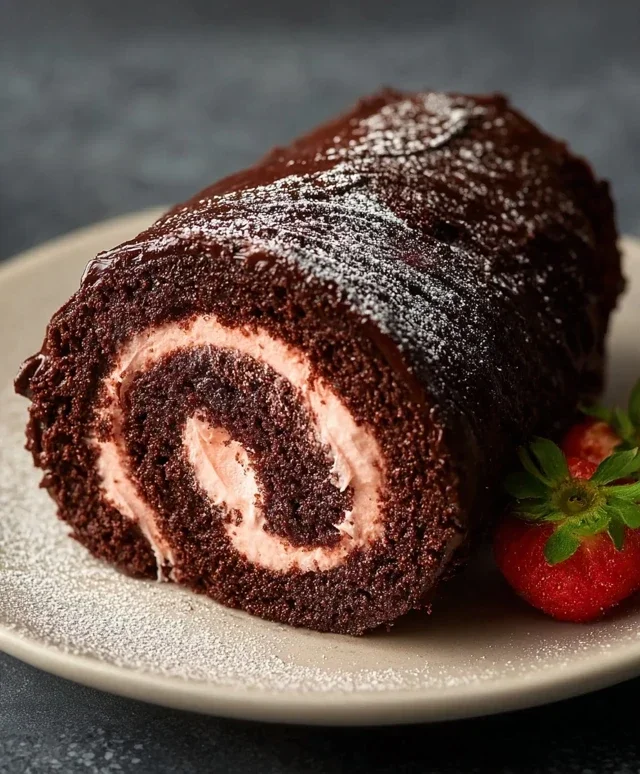
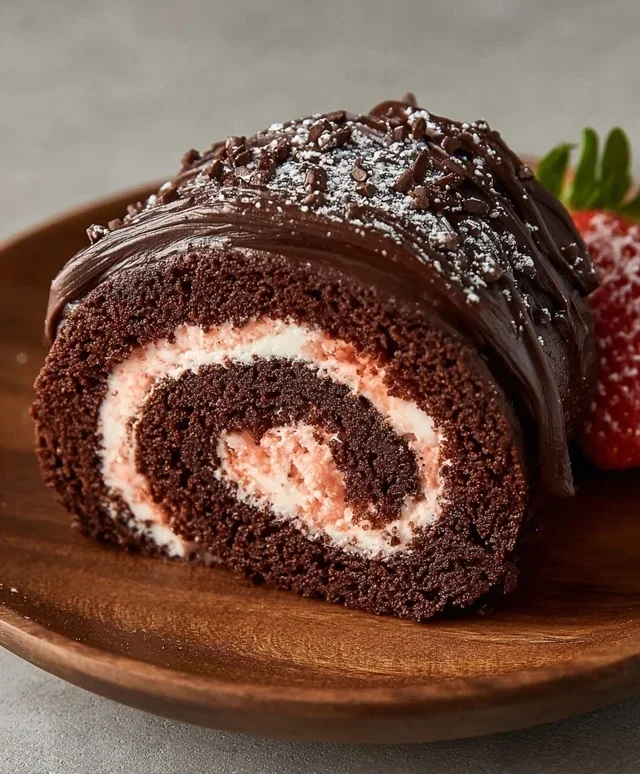
Welcome to a delightful journey into creating an incredibly easy and utterly delicious Chocolate Swiss Roll! This recipe is designed to be approachable, even for begin extractner bakers, and the result is a light, airy, and intensely chocolatey sponge that rolls beautifully. We’re using a clever combination of flours to achieve a fantastic texture without relying on gluten. The creamy, dairy-free filling is a dream, and the optional strawberry garnish adds a burst of freshness that perfectly complements the rich chocolate. Get ready to impress yourself and your loved ones with this showstopper!
Ingredients:
For the Chocolate Sponge
Let’s get started with the heart of our Swiss roll – the chocolate sponge! This cake bakes up incredibly light and moist, thanks to the aquafaba which acts as a fantastic egg replacer, creating a beautiful, airy texture.
Prepare for Rolling
While your cake is baking, let’s get everything ready for the rolling process. This part is crucial for preventing cracks and ensuring a perfect roll.
For the Creamy Filling
This dairy-free filling is a revelation! It’s rich, smooth, and has a subtle tang that’s delightful.
Assemble Your Masterpiece
The moment of truth! Let’s bring it all together.
Enjoy your homemade, easy Chocolate Swiss Roll! It’s a testament to how delicious dairy-free and gluten-free baking can be.
Conclusion:
And there you have it – your guide to creating a delightful, Easy Chocolate Swiss Roll that’s surprisingly achievable for home bakers! This recipe truly shines because it simplifies a classic dessert, making it accessible without sacrificing that impressive visual appeal and delicious chocolatey flavor. The light, airy sponge and decadent filling are a match made in heaven, perfect for any occasion. I encourage you to give this recipe a go; you might just surprise yourself with how beautifully it turns out!
Serving this gorgeous roll is an event in itself. A simple dusting of powdered sugar or a drizzle of extra chocolate ganache elevates its presentation. It’s wonderful served with a dollop of whipped cream, fresh berries, or even a scoop of vanilla ice cream for an extra treat. For variations, consider adding a touch of espresso powder to the sponge for a mocha twist, or a hint of orange zest to the filling. You could also experiment with different fillings, like a raspberry jam or a cream cheese frosting, for a unique flavor profile.
Don’t be intimidated by the rolling process; take your time, and the sponge will cooperate beautifully. I promise the end result is absolutely worth it. Happy baking!
Frequently Asked Questions:
Q: My chocolate sponge roll cracked when I tried to roll it. What did I do wrong?
A: Cracking often happens if the sponge is overbaked or not rolled while still warm enough. Ensure you bake just until set (a toothpick inserted should come out clean or with moist crum extractbs, not wet batter). Also, make sure to roll it immediately after taking it out of the oven, while it’s still pliable. Don’t let it cool completely before attempting to roll.
Q: Can I make the chocolate Swiss roll ahead of time?
A: Yes, you absolutely can! You can bake the sponge and let it cool completely, then wrap it tightly and refrigerate for up to a day before filling and rolling. The assembled roll can also be made a few hours in advance and kept chilled. It might be slightly firmer when cold, so allowing it to sit at room temperature for about 15-20 minutes before serving often helps.
Easy Chocolate Swiss Roll
A simple and delicious vegan chocolate swiss roll made with oat flour and aquafaba.
Ingredients
-
135 g oat flour
-
30 g cassava flour
-
30 g cocoa powder
-
1 tbsp arrowroot starch
-
1 1/2 tsp baking powder
-
1/2 tsp baking soda
-
122 mL aquafaba, room temperature
-
200 g organic granulated sugar or coconut sugar, divided
-
100 g unsweetened applesauce, room temperature
-
60 g unsweetened dairy free yogurt, room temperature
-
2 tbsp cocoa powder for dusting the dish towel
-
1 cup sliced strawberries, for garnish
-
226 g vegan butter, room temperature
-
70 g freeze dried strawberries, pulsed into a flour
-
Coconut fat from 1 can full-fat coconut cream
Instructions
-
Step 1
Preheat oven to 350°F (175°C). Line a 10×15 inch baking pan with parchment paper and grease lightly. Dust a clean kitchen towel with 2 tbsp cocoa powder. -
Step 2
In a large bowl, whisk together oat flour, cassava flour, 30g cocoa powder, arrowroot starch, baking powder, and baking soda. -
Step 3
In a separate bowl, whisk aquafaba and half of the sugar until stiff peaks form. Gently fold in applesauce and dairy-free yogurt. -
Step 4
Gradually fold the dry ingredients into the wet ingredients until just combined. Pour batter into the prepared baking pan and spread evenly. -
Step 5
Bake for 12-15 minutes, or until a toothpick inserted into the center comes out clean. Immediately invert the cake onto the prepared kitchen towel. Peel off parchment paper. -
Step 6
While the cake cools, prepare the frosting: Cream together vegan butter and the remaining sugar until light and fluffy. Beat in the pulsed freeze-dried strawberries and coconut cream fat until smooth. -
Step 7
Once the cake has cooled slightly, spread the frosting evenly over the surface. Starting from one end, tightly roll up the cake using the towel to assist. Let it chill for at least 30 minutes. -
Step 8
Slice and garnish with fresh strawberries before serving.
Important Information
Nutrition Facts (Per Serving)
It is important to consider this information as approximate and not to use it as definitive health advice.
Allergy Information
Please check ingredients for potential allergens and consult a health professional if in doubt.