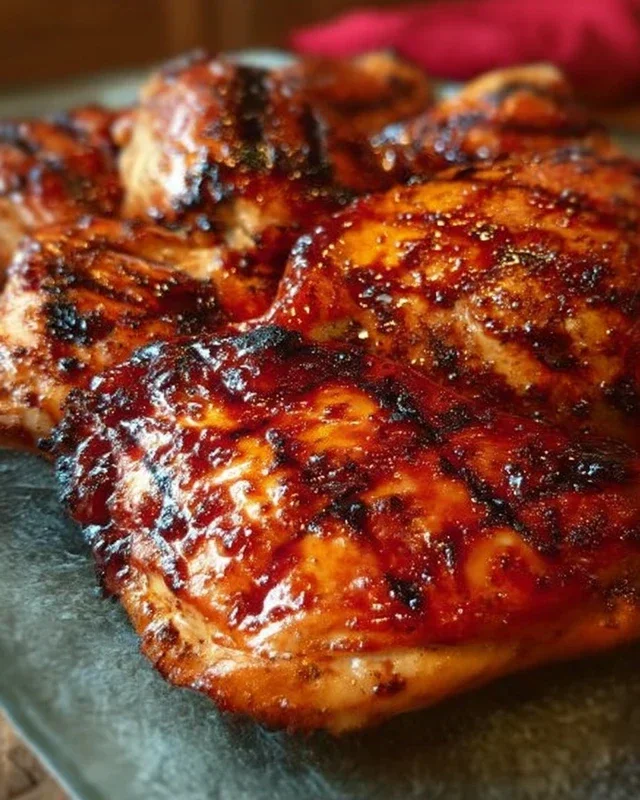
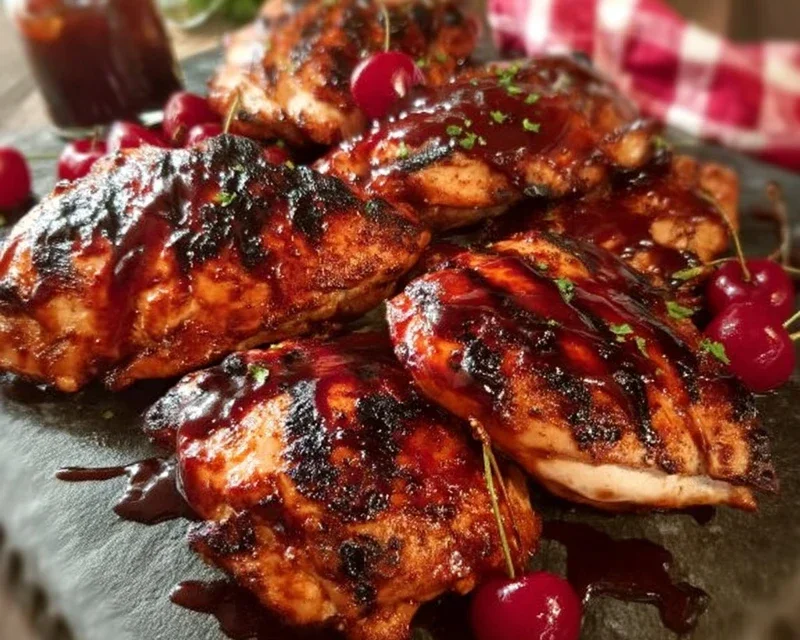
Cherry Dr Pepper Grilled Chicken Recipe
Cherry Dr. Pepper Grilled Chicken is about to become your new summer obsession. Forget boring marinades; we’re about to unlock a flavor explosion that’s both unexpected and unbelievably delicious. Imagin extracte this: tender, juicy chicken infused with the sweet, spicy, and slightly fruity notes of cherry Dr. Pepper, kissed by the smoky char of the grill. This isn’t just grilled chicken; it’s a culinary adventure that will have your taste buds singin extractg. People adore this dish because it’s incredibly easy to make, requires minimal active cooking time, and delivers a flavor profile that’s a perfect balance of sweet and savory. What truly sets our Cherry Dr. Pepper Grilled Chicken apart is the magical transformation that happens when the soda caramelizes on the grill, creating a sticky, flavorful glaze that’s simply irresistible. Get ready for compliments – and maybe a few requests for the recipe!
Cherry Dr. Pepper Grilled Chicken
Get ready for a grilling experience that’s both delightfully sweet and savory, with a hint of nostalgic fizz! This Cherry Dr. Pepper Grilled Chicken recipe is a surefire way to impress your taste buds and your guests. The unique combination of Cherry Dr. Pepper with classic barbecue flavors creates a glaze that’s utterly addictive, caramelizing beautifully on the grill to give your chicken an irresistible char and a sticky, flavorful finish. It’s perfect for backyard barbecues, casual weeknight dinners, or any occasion where you want to elevate your chicken game.
The magic of this recipe lies in the simple yet incredibly effective glaze. The sweetness of the Cherry Dr. Pepper, combined with the tang of ketchup and the depth of tomato paste, creates a robust base. Brown sugar adds another layer of caramelization, while Worcestershire sauce brings umami. A whisper of liquid smoke enhances that grilled flavor, even before the chicken hits the grates. Don’t let the soda in the ingredients list fool you; it transforms into something truly special when simmered and reduced. This recipe is incredibly forgiving and adaptable, making it a favorite for cooks of all levels. Whether you’re a seasoned griller or just starting out, you’ll find this recipe a joy to prepare.
Ingredients:
Cooking Instructions:
Step 1: Crafting the Irresistible Cherry Dr. Pepper Glaze
The foundation of this incredible grilled chicken is its glaze, and it’s surprisingly easy to make. In a medium saucepan, combine the 12 oz can of Cherry Dr. Pepper, 1 cup of ketchup, the 6 oz can of tomato paste, and 1 cup of brown sugar. These ingredients will meld together to create a wonderfully sweet and tangy base. Add in the 1 tablespoon of Worcestershire sauce, 1/2 teaspoon of onion powder, 1/2 teaspoon of black pepper, 1/2 teaspoon of liquid smoke, 1/2 teaspoon of chili powder, and 1 teaspoon of minced garlic. The liquid smoke is key to imparting that authentic smoky flavor, even if your grill isn’t super smoky. Whisk all these ingredients together until they are well combined.
Now, it’s time to let the flavors work their magic. Place the saucepan over medium heat and bring the mixture to a simmer. Once simmering, reduce the heat to low and let it cook for about 20-30 minutes, stirring occasionally. The goal here is to allow the glaze to thicken and reduce, concentrating its delicious flavors. You’re looking for a consistency that’s thick enough to coat the back of a spoon. This reduction process is crucial; it transforms the thin liquid into a sticky, syrupy glaze that will adhere beautifully to the chicken and caramelize on the grill. Be careful not to let it boil too vigorously, as it can burn. Once it reaches the desired thickness, remove the glaze from the heat and set it aside. You can make this glaze ahead of time and store it in an airtight container in the refrigerator for up to 3 days.
Step 2: Preparing the Chicken for the Grill
While your glaze is simmering and reducing, it’s time to get your chicken ready. If you’re using a whole chicken cut into pieces, ensure all the pieces are separated and patted dry with paper towels. If you’re using pre-cut dark meat chicken, like thighs or drum extractsticks, make sure they are also patted thoroughly dry. This step is important for ensuring your seasonings adhere well and for achieving a nice sear on the grill.
Once the chicken is dry, it’s time to season it generously. Sprinkle all sides of each chicken piece with 3 teaspoons of seasoning salt. This is your primary salt seasoning and will add a foundational layer of flavor. Then, dust all the chicken pieces with 1 teaspoon of paprika. The paprika not only adds a beautiful reddish hue but also contributes a subtle, earthy sweetness. Ensure each piece is evenly coated with both the seasoning salt and the paprika. You can also add a little extra black pepper at this stage if you like a spicier kick. Place the seasoned chicken pieces on a platter or baking sheet, ensuring they aren’t overcrowded, and let them sit at room temperature for about 15-20 minutes while your grill preheats. This allows the seasonings to penetrate the meat slightly and helps the chicken cook more evenly.
Step 3: Grilling the Chicken to Perfection
Preheat your grill to medium-high heat. It’s important to have a hot grill to get a good sear and prevent the chicken from sticking. Make sure your grill grates are clean and lightly oiled. This is where the magic of grilling truly happens. Carefully place the seasoned chicken pieces onto the preheated grill. If you have larger pieces like breasts or thighs, you might want to place them skin-side down first if applicable.
Allow the chicken to cook for about 6-8 minutes per side, depending on the thickness of the pieces, to develop a nice sear and get some initial cooking done. Resist the urge to move the chicken too much during this initial searing phase, as this can prevent you from getting those attractive grill marks. You’re looking for a nice golden-brown color and a slight char on the exterior.
Step 4: Glazing and Finishing on the Grill
This is the moment where your Cherry Dr. Pepper glaze truly shines. After the initial searing, begin extract brushing the chicken generously with the prepared glaze. You’ll want to do this on both sides of the chicken pieces. As the glaze hits the hot grill, it will start to caramelize and thicken further, creating that sticky, sweet, and savory coating we’re after.
Continue grilling the chicken, turning and basting with the glaze every 5-7 minutes. The total grilling time will vary depending on the size and type of chicken pieces, but generally, you’re looking at about 20-30 minutes total grilling time. You want the chicken to be cooked through, with an internal temperature of 165°F (74°C) in the thickest part of the meat, away from the bone. The glaze will become beautifully sticky and caramelized, giving the chicken a gorgeous, lacquered finish. Keep a close eye on it during this glazing phase, as the sugars in the glaze can burn if the heat is too high or if it’s left unattended for too long.
Step 5: Resting and Serving
Once your Cherry Dr. Pepper grilled chicken has reached an internal temperature of 165°F (74°C) and is beautifully glazed, remove it from the grill. Transfer the chicken to a clean platter or cutting board. It’s crucial to let the chicken rest for at least 5-10 minutes before serving. This resting period allows the juices to redistribute throughout the meat, resulting in a more tender and moist chicken. If you cut into it too soon, all those delicious juices will run out, leaving you with drier chicken.
While the chicken is resting, you can use any leftover glaze to spoon over the top for an extra burst of flavor. Serve your Cherry Dr. Pepper Grilled Chicken hot, alongside your favorite barbecue sides like coleslaw, potato salad, or grilled corn on the cob. The sweet, tangy, and slightly smoky notes of this chicken are sure to be a crowd-pleaser. Enjoy the fruits of your grilling labor!
Conclusion:
And there you have it! This Cherry Dr. Pepper grilled chicken is an absolute winner, offering a fantastic balance of sweet, tangy, and savory flavors that will have everyone asking for seconds. The secret lies in the magic of Dr. Pepper and cherry, creating a glaze that caramelizes beautifully on the grill, infusing the chicken with an irresistible depth. It’s incredibly versatile, making it perfect for a casual backyard barbecue, a special occasion dinner, or even a weeknight meal when you’re craving something a little more exciting than the usual.
I love serving this Cherry Dr. Pepper grilled chicken with a side of creamy coleslaw, corn on the cob, or a fresh summer salad. For variations, feel free to experiment! You could add a pinch of cayenne pepper to the glaze for a touch of heat, or even throw in some pineapple chunks on the grill alongside the chicken for an extra tropical twist. Don’t be afraid to get creative!
I truly encourage you to give this recipe a try. It’s surprisingly easy to make and the results are so rewarding. You’ll be amazed at how a few simple ingredients can transform ordinary chicken into something truly special. So fire up that grill and get ready to impress!
Frequently Asked Questions:
Can I make this Cherry Dr. Pepper grilled chicken indoors?
Absolutely! While grilling offers that wonderful smoky char, you can adapt this recipe for indoor cooking. You could pan-sear the chicken in a cast-iron skillet on the stovetop, basting it with the glaze as it cooks. Alternatively, you can bake it in the oven at around 375°F (190°C), basting every 10-15 minutes until cooked through. Just keep an eye on it to prevent the glaze from burning.
What other meats can I use with this Cherry Dr. Pepper glaze?
This glaze is wonderfully versatile! While it’s fantastic on chicken, it also works beautifully with beef chops or beef tenderloin. You could even try it on shrimp skewers for a quick and flavorful appetizer. Just adjust the cooking time accordingly for different proteins.
How long does the glaze take to reduce?
When making the glaze on the stovetop, it typically takes about 10-15 minutes over medium heat for it to thicken to a syrupy consistency. You want it to coat the back of a spoon. If it gets too thick, you can always whisk in a tablespoon or two of Dr. Pepper to thin it out.
Cherry Dr. Pepper Grilled Chicken
A sweet and smoky grilled chicken recipe featuring a glaze made with Cherry Dr. Pepper, ketchup, and brown sugar.
Ingredients
-
1 – 12 oz can Cherry Dr. Pepper
-
1 Cup Ketchup
-
1 – 6 oz. can tomato paste
-
1 Cup Brown Sugar
-
1 Tablespoon Worcestershire sauce
-
1/2 tsp. Onion Powder
-
1/2 tsp. black pepper
-
1/2 tsp. liquid smoke
-
1/2 tsp. Chili Powder
-
1 tsp. minced garlic
-
1 whole chicken cut up OR 1 package of dark meat chicken cut up about 12 pieces of chicken
-
3 teaspoons Seasoning Salt
-
1 tsp Paprika
Instructions
-
Step 1
In a medium saucepan, combine the Cherry Dr. Pepper, ketchup, tomato paste, brown sugar, Worcestershire sauce, onion powder, black pepper, liquid smoke, chili powder, and minced garlic. Stir well. -
Step 2
Bring the mixture to a simmer over medium heat, then reduce heat to low and let it cook for 15-20 minutes, stirring occasionally, until it thickens into a glaze. -
Step 3
While the glaze is simmering, season the chicken pieces generously with seasoning salt and paprika. You can grill the chicken directly or marinate it in some of the glaze for at least 30 minutes. -
Step 4
Preheat your grill to medium-high heat. Grill the chicken for about 20-25 minutes per side, or until cooked through and internal temperature reaches 165°F (74°C). -
Step 5
During the last 10 minutes of grilling, brush the chicken generously with the prepared Cherry Dr. Pepper glaze. Continue grilling, turning occasionally, allowing the glaze to caramelize. -
Step 6
Remove chicken from the grill and let it rest for a few minutes before serving. Serve with extra glaze on the side if desired.
Important Information
Nutrition Facts (Per Serving)
It is important to consider this information as approximate and not to use it as definitive health advice.
Allergy Information
Please check ingredients for potential allergens and consult a health professional if in doubt.