Cheesy Garlic Bread Recipe – Best Flavor Ever
BEST CHEESY GARLIC BREAD RECIPE. Let’s be honest, who can resist the siren song of warm, garlicky, cheesy goodness? It’s the ultimate comfort food, a universally beloved side dish that elevates any meal from ordinary to extraordinary. Whether you’re pairing it with a hearty pasta, a comforting soup, or simply devouring it on its own, this dish is pure culinary magic. But what makes a cheesy garlic bread truly the best? It’s a symphony of textures and flavors: the crispy, golden crust giving way to a soft, pillowy interior, all infused with that irresistible aroma of toasted garlic and melted, gooey cheese. Forget those store-bought versions that taste of disappointment; we’re talking about a homemade masterpiece that will have everyone beggin extractg for the recipe. Get ready to experience the absolute BEST cheesy garlic bread you’ve ever made!
BEST CHEESY GARLIC BREAD RECIPE
There are few things in this world as universally beloved as warm, garlicky, cheesy bread. It’s the ultimate comfort food, the perfect sidekick to any pasta dish, soup, or just enjoyed on its own. And let me tell you, I’ve spent a good chunk of my culinary journey perfecting this recipe. Forget those dry, sad versions you might have encountered. This is the cheesy garlic bread dreams are made of – golden, crispy edges, a soft and pillowy interior, and an non-intoxicating aroma that will have everyone gathering in your kitchen.
The secret lies in a few key elements: using fresh garlic, roasting some of it for a deeper, sweeter flavor, and creating a luscious garlic butter mixture that truly infuses every bite. We’re also opting for King’s Hawaiian Origin extractal Sweet Rolls, which contribute a delightful subtle sweetness and an incredibly tender crum extractb that transforms into pure magic when baked. If you can’t find them, a good quality French baguette will also do the trick, though I highly recommend seeking out those rolls for an unparalleled experience.
Let’s get our ingredients together and prepare to create something truly spectacular!
Ingredients:
Getting Started: Roasting the Garlic
Before we dive into assembling our bread, we need to unlock the incredible flavor of roasted garlic. This step is crucial for that deep, sweet, and mellow garlic taste that isn’t sharp or overpowering.
Crafting the Garlic Butter Spread
Now for the magic mixture that will coat our bread and create that irresistible flavor.
Assembling the Cheesy Garlic Bread
This is where our King’s Hawaiian rolls come into play, or your baguette if you’ve chosen that route. The key is to get the butter mixture into all those nooks and crannies.
Baking to Golden Perfection
The final stage is where the magic happens in the oven.
Conclusion:
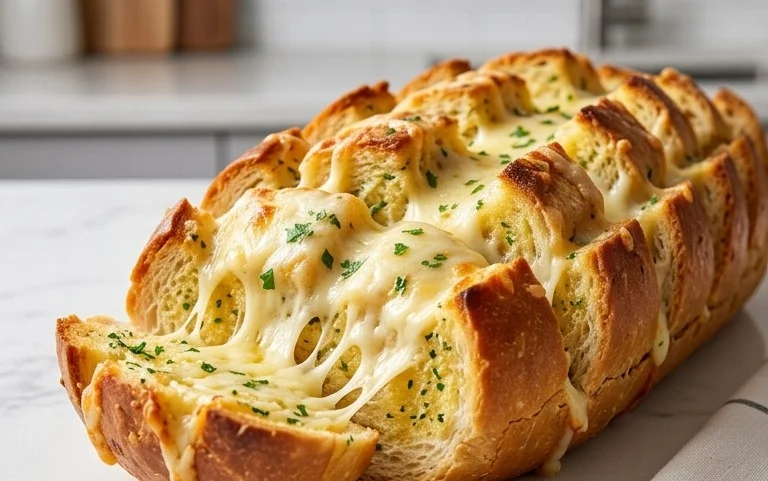
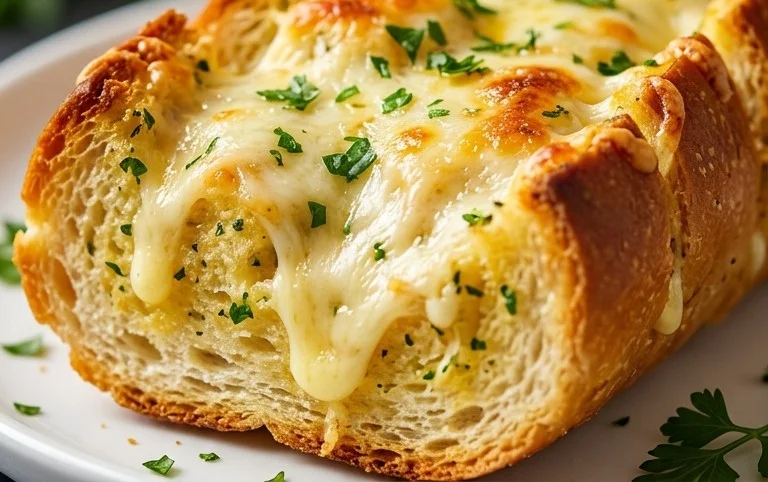
I truly hope you enjoyed learning how to make this BEST CHEESY GARLIC BREAD RECIPE! This recipe is fantastic because it strikes the perfect balance between crispy, buttery bread and a gooey, flavorful cheese topping infused with aromatic garlic and herbs. It’s incredibly simple to whip up, making it an ideal side dish for any meal or a satisfying snack on its own. The aroma alone while it’s baking is enough to make your mouth water! Imagin extracte serving this golden-brown perfection alongside your favorite pasta, soup, or even as a standalone appetizer for your next gathering. You can easily customize it by adding a pinch of red pepper flakes for a little heat, or by using a different blend of cheeses like Monterey Jack or Provolone for a unique flavor profile. Don’t be afraid to experiment with fresh herbs like chives or parsley sprinkled on top before serving. Give this recipe a try – I promise it will become a staple in your kitchen!
Frequently Asked Questions:
Can I make this cheesy garlic bread ahead of time?
While it’s best enjoyed fresh, you can prepare the garlic butter mixture and spread it on the bread a few hours in advance. Cover it tightly and refrigerate. Bake it when you’re ready to serve, you might need to add a few extra minutes to the baking time.
What kind of bread is best for this recipe?
A crusty baguette, Italian loaf, or even a sturdy sourdough works wonderfully. The key is a bread that can hold up to the garlic butter and cheese without becoming too soggy. Avoid very soft, airy breads.
How can I make this recipe dairy-free?
You can use a good quality dairy-free butter substitute and your favorite dairy-free shredded cheese blend. Ensure the cheese melts well for the best texture. Nutritional yeast can also add a cheesy flavor dimension.
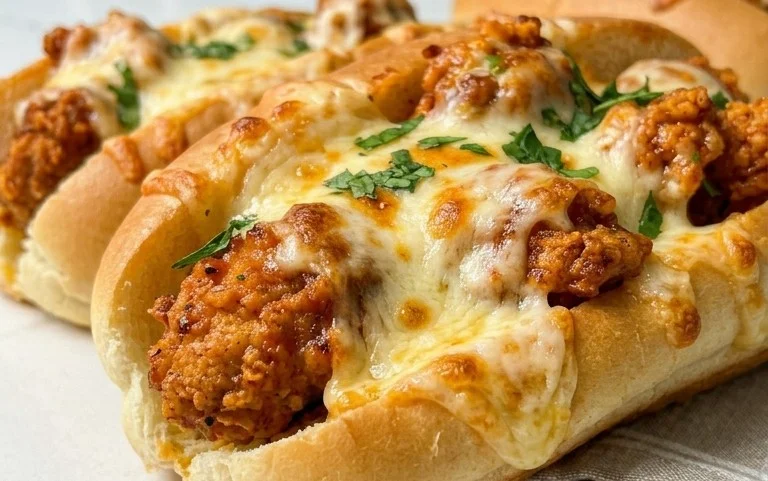
BEST CHEESY GARLIC BREAD RECIPE
Indulge in the ultimate cheesy garlic bread, featuring a flavorful garlic butter spread on soft Hawaiian rolls, baked to golden perfection with melty mozzarella.
Ingredients
-
8-10 garlic cloves
-
2 tbsp olive oil
-
Pinch of salt
-
Roasted garlic from above
-
½ cup butter, melted
-
1 egg
-
¼ cup milk
-
½ tsp salt
-
½ tsp paprika
-
2 tbsp chopped fresh parsley
-
12 King’s Hawaiian Origin extractal Hawaiian Sheet Rolls, kept in the full sheet form
-
2 cups shredded mozzarella cheese
-
Chopped parsley and chili flakes for serving
Instructions
-
Step 1
Roast the garlic: Preheat oven to 400°F (200°C). Slice off the top of the garlic head, drizzle with olive oil, and sprinkle with a pinch of salt. Wrap in foil and roast for 40-50 minutes until soft and golden. -
Step 2
Prepare the garlic butter spread: In a bowl, mash the roasted garlic cloves until smooth. Add the melted butter, egg, milk, ½ tsp salt, ½ tsp paprika, and 2 tbsp chopped fresh parsley. Whisk until well combined. -
Step 3
Prepare the rolls: Slice the King’s Hawaiian Sheet Rolls horizontally, keeping them attached on one side to form a book. If using a baguette, slice it lengthwise. -
Step 4
Spread the garlic butter: Generously spread the prepared garlic butter mixture over the cut surfaces of the rolls or baguette. -
Step 5
Add cheese: Sprinkle the shredded mozzarella cheese evenly over the garlic butter spread. -
Step 6
Bake: Place the rolls or baguette on a baking sheet. Bake in the preheated oven (or a broiler) for 5-10 minutes, or until the cheese is melted and bubbly and the edges are golden brown. Watch closely to prevent burning. -
Step 7
Serve: Garnish with fresh chopped parsley and chili flakes if desired. Slice and serve immediately.
Important Information
Nutrition Facts (Per Serving)
It is important to consider this information as approximate and not to use it as definitive health advice.
Allergy Information
Please check ingredients for potential allergens and consult a health professional if in doubt.