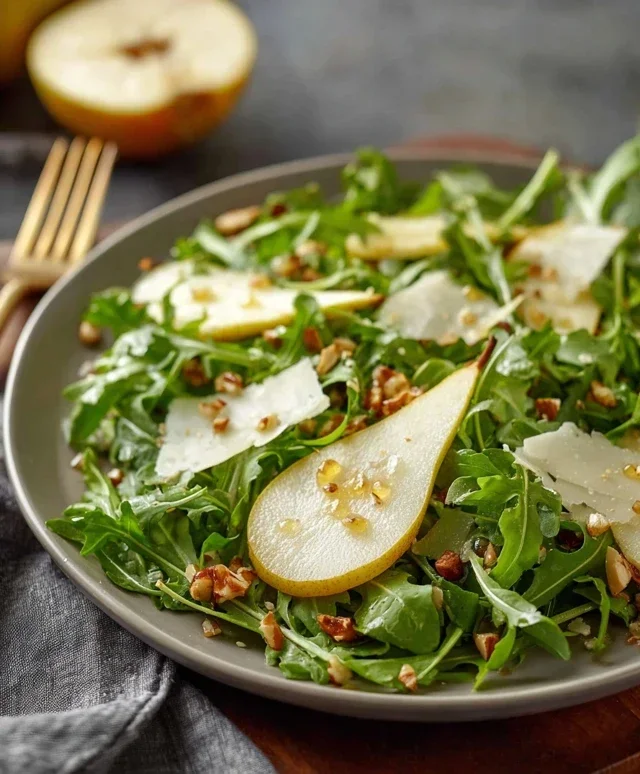
Arugula Pear Salad – Fresh & Easy Recipe
Arugula pear salad is a dish that truly sings with vibrant flavors and elegant simplicity. If you’re searching for a salad that’s more than just a side dish, something that feels both refreshing and sophisticated, then our arugula pear salad is precisely what you need. It’s a crowd-pleaser for so many reasons: the peppery bite of the fresh arugula provides a fantastic counterpoint to the sweet, juicy pears, creating a perfectly balanced bite every single time. What makes this particular arugula pear salad so special is the delightful interplay of textures – the crisp pears, the tender greens, and the crunch of toasted nuts, all brought together with a bright, zesty dressing that ties everything together beautifully. It’s the kind of salad that elevates any meal, from a casual lunch to a more formal dinner party. Get ready to impress yourself and your guests with this absolute gem!
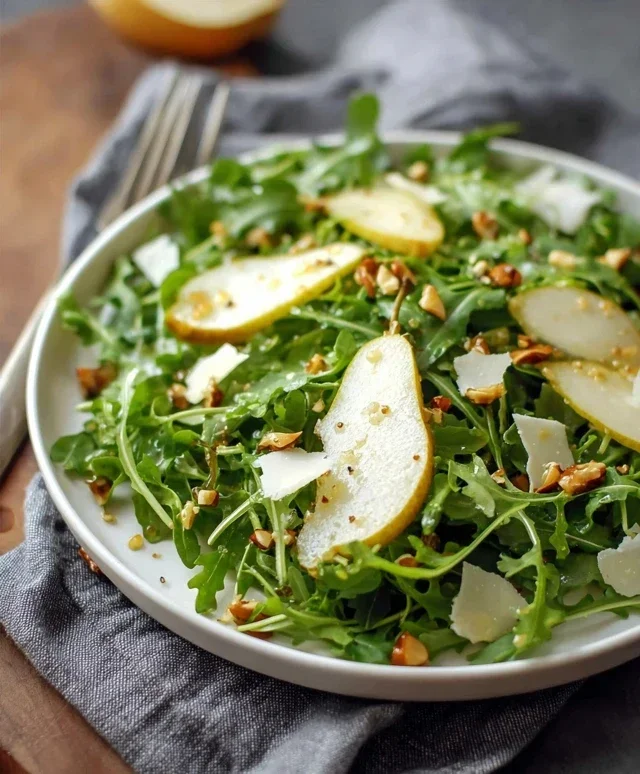
Arugula Pear Salad
This Arugula Pear Salad is a symphony of flavors and textures, a delightful balance of peppery greens, sweet fruit, crunchy nuts, and tangy cheese. It’s the kind of salad that feels both sophisticated and effortlessly simple, perfect for a light lunch, a stunning starter, or a vibrant side dish for a weeknight meal. The combination of ingredients is a classic for a reason, offering a refreshing and satisfying experience that I find myself returning to again and again. Let’s dive into how we’ll create this culinary gem.
Ingredients:
Preparation and Assembly
Let’s begin extract by gathering all our components. The beauty of this salad lies in its simplicity, and with a little mindful preparation, we’ll have it ready to enjoy in no time.
Step 1: Toasting the Walnuts
The first step is to lightly toast our walnuts. This might seem like a small detail, but it makes a world of difference in bringin extractg out their natural oils and intensifying their nutty flavor. You can do this in a dry skillet over medium-low heat. Spread the walnuts in a single layer and stir them frequently, watching them carefully. They’ll start to smell fragrant and become lightly golden brown. This usually takes about 5-7 minutes. Once they’re toasted, immediately remove them from the skillet and transfer them to a plate to cool. This prevents them from continuing to cook in the residual heat of the pan, which can make them bitter. We want them perfectly toasted, not burnt!
Step 2: Preparing the Pears and Arugula
Next, we’ll prepare our fruit and greens. For the pears, choose ones that are ripe but still firm enough to hold their shape when sliced. Varieties like Anjou, Bartlett, or Bosc work beautifully here. Core the pears and slice them thinly. If you’re preparing the salad a little in advance, you can toss the pear slices with a tiny squeeze of lemon juice to prevent browning, though in this recipe, we’re aiming for immediate assembly, so it’s usually not necessary. Rinse your baby arugula thoroughly and ensure it’s completely dry. A salad spinner is your best friend here; excess water can dilute the dressing and make the leaves soggy. Gently pat any remaining moisture with a clean kitchen towel or paper towels if you don’t have a spinner.
Step 3: Crafting the Dijon Vinaigrette
Now, let’s whip up our vibrant dressing. In a small bowl or a jar with a tight-fitting lid, combine the extra virgin extract olive oil, apple cider vinegar, honey, Dijon mustard, fine salt, and black pepper. Whisk vigorously until the ingredients are well emulsified, meaning they are blended smoothly together and no longer separating. If you’re using a jar, simply put all the ingredients in and shake it until it’s well combined. The Dijon mustard acts as an emulsifier, helping the oil and vinegar to bind. The honey adds a touch of sweetness to balance the tangin extractess of the vinegar and the sharpness of the mustard, while the salt and pepper enhance all the flavors. Taste and adjust seasonings if needed. You might prefer a touch more sweetness or a bit more acidity, so feel free to tweak it to your liking.
Step 4: Assembling the Salad Base
In a large salad bowl, place the dried baby arugula. This forms the peppery foundation of our salad. Drizzle about half of the prepared vinaigrette over the arugula. Gently toss the leaves to coat them lightly with the dressing. We don’t want to drown the arugula; a light coating is all that’s needed at this stage. This allows the dressing to meld with the peppery notes of the greens before we add the other components.
Step 5: Adding the Stars and Finishing Touches
It’s time to bring all the beautiful elements together. Arrange the sliced pears over the dressed arugula. Scatter the crum extractbled blue cheese generously over the pears and arugula. Finally, sprinkle the toasted walnuts on top, adding that crucial crunch. Drizzle the remaining vinaigrette over the entire salad. You can serve it immediately, or if you like, give it one final gentle toss to ensure everything is lightly coated. The warmth from the toasted walnuts and the coolness of the pears and arugula create a delightful contrast, while the sharp, creamy blue cheese cuts through the sweetness of the pears and the richness of the walnuts. This salad is a testament to how a few simple, high-quality ingredients can come together to create something truly spectacular. Enjoy every delicious bite!
Conclusion:
I hope you’ve enjoyed learning how to make this delightful Arugula Pear Salad! It’s truly a star for a reason. The peppery bite of the arugula perfectly complements the sweet, crisp pears, while the tangy vinaigrette ties everything together beautifully. It’s incredibly quick to assemble, making it an ideal choice for a light lunch, an elegant appetizer, or a vibrant side dish for any meal. Don’t be afraid to experiment with the suggested variations to truly make it your own. Whether you’re a seasoned cook or just starting out in the kitchen, this recipe is wonderfully accessible and rewarding. I encourage you to give it a try – I’m confident you’ll love its fresh flavors and satisfying crunch!
Frequently Asked Questions:
Can I use different types of pears?
Absolutely! While Bosc or Anjou pears are fantastic for their firmness and sweetness, you can certainly experiment with others. Just ensure the pears you choose are ripe but still firm enough to hold their shape when sliced. Varieties like Bartlett, if slightly underripe, can also work well.
What other greens can I use instead of arugula?
If arugula’s peppery flavor isn’t your favorite, feel free to substitute it with other salad greens. Baby spinach offers a milder, sweeter taste, while mixed greens provide a good balance. For a more robust flavor, consider adding some radicchio or endive.
How can I make this salad more substantial for a main course?
To turn this into a satisfying main course, consider adding some protein. Grilled chicken or shrimp are wonderful additions, as are crum extractbled goat cheese or feta. Toasted nuts like walnuts or pecans also add a lovely texture and heartiness.
Arugula Pear Salad
A refreshing salad featuring peppery arugula, sweet pears, crunchy walnuts, and tangy blue cheese, dressed with a simple vinaigrette.
Ingredients
-
½ cup (60 grams) walnuts, lightly toasted
-
3 juicy and ripe pears, sliced
-
5oz (150 grams) baby arugula
-
4oz (110 grams) blue cheese, crumbled
-
1 ½ tablespoon extra virgin olive oil
-
1 ½ tablespoon apple cider vinegar
-
2 teaspoons honey
-
½ teaspoons Dijon mustard
-
¼ teaspoon fine salt
-
⅛ teaspoon black pepper
Instructions
-
Step 1
Toast the walnuts in a dry skillet over medium heat until fragrant, about 5-7 minutes. Let cool. -
Step 2
Wash and slice the ripe pears. -
Step 3
In a large bowl, combine the baby arugula and sliced pears. -
Step 4
In a small bowl, whisk together the extra virgin olive oil, apple cider vinegar, honey, Dijon mustard, fine salt, and black pepper until well combined to make the vinaigrette. -
Step 5
Crumble the blue cheese over the arugula and pear mixture. -
Step 6
Add the toasted walnuts to the salad. -
Step 7
Drizzle the vinaigrette over the salad and toss gently to coat.
Important Information
Nutrition Facts (Per Serving)
It is important to consider this information as approximate and not to use it as definitive health advice.
Allergy Information
Please check ingredients for potential allergens and consult a health professional if in doubt.