Decadent Triple-Layer Chocolate Mint Squares Recipe
Triple-layer chocolate mint squares are the ultimate indulgence for any dessert lover. If you’re like me, the mere mention of rich chocolate paired with cool, refreshing mint sends your taste buds into overdrive. This isn’t just another sweet treat; these triple-layer chocolate mint squares are a symphony of textures and flavors, designed to wow with every bite. We’re talking a decadent chocolate base, a creamy, dreamy mint filling, and a smooth, glossy chocolate ganache topping. It’s a classic flavor combination that’s universally adored, and in this layered format, it’s elevated to something truly spectacular. Imagin extracte the satisfying crum extractble of the crust, the ethereal lightness of the mint layer, and the intense chocolate finish – it’s pure bliss. Get ready to impress yourself and everyone lucky enough to share these amazing triple-layer chocolate mint squares.
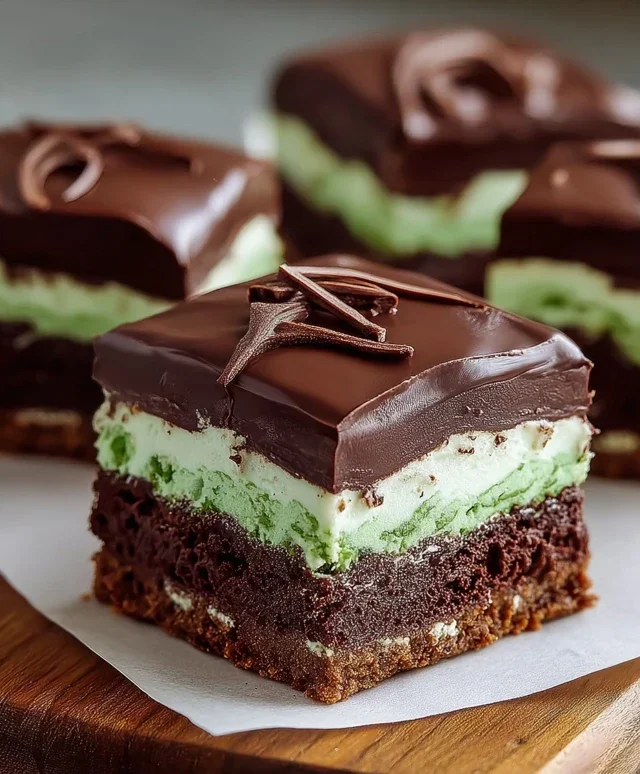
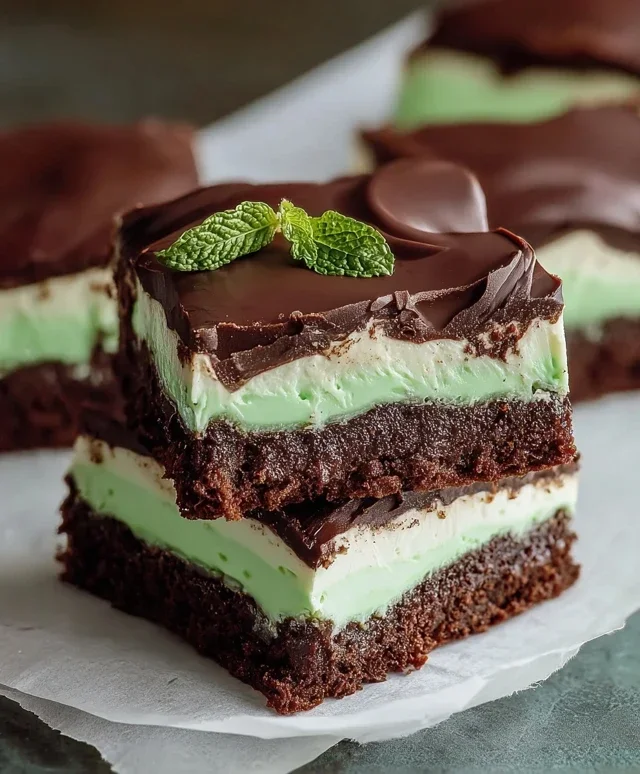
Triple-Layer Chocolate Mint Squares
Get ready to indulge in a truly decadent treat! These Triple-Layer Chocolate Mint Squares are a symphony of rich chocolate, creamy mint, and a satisfyingly chewy base. Perfect for special occasions, a delightful dessert after a meal, or simply when you’re craving something extraordinary, these bars are sure to impress. The beauty of this recipe lies in its distinct layers, each contributing its own unique texture and flavor profile to create a harmonious whole. We’re going to build these from the bottom up, starting with a fudgy chocolate base, followed by a vibrant minty cream cheese layer, and finally, a luscious chocolate ganache topping. It sounds complex, but trust me, with a little patience and careful assembly, you’ll be rewarded with a dessert that tastes like it came straight from a gourmet bakery.
Ingredients:
Cooking Instructions:
The Fudgy Chocolate Base
The foundation of our delicious squares starts with a rich and dense chocolate base. It’s almost like a brownie, but with a slightly chewier texture that holds up beautifully to the other layers.
1. Preheat your oven to 350°F (175°C). Grease and flour a 9×13 inch baking pan. This is crucial for easy removal later, ensuring your beautiful layers don’t stick. I like to line mine with parchment paper, leaving an overhang on the sides, which acts as handles to lift the entire slab out of the pan once it’s cooled.
2. In a medium saucepan over low heat, melt 1 cup of salted butter and 4 oz. of semi-sweet chocolate chips. Stir constantly until the chocolate is completely melted and the mixture is smooth and glossy. Be patient with this step; low heat prevents scorching. Remove from heat and set aside to cool slightly.
3. In a large bowl, whisk together 2 cups of granulated sugar and 2 teaspoons of vanilla extract. Add the slightly cooled chocolate and butter mixture to the sugar mixture and stir until well combined.
4. Gradually add the 4 large eggs, one at a time, beating well after each addition until the batter is smooth and emulsified. This creates a rich, fudgy texture.
5. Gently fold in 1 ½ cups of all-purpose flour. Mix until just combined; do not overmix, as this can result in a tougher base. The batter will be thick.
6. Pour the batter into the prepared baking pan and spread it evenly. Bake for 20-25 minutes, or until a toothpick inserted into the center comes out with moist crum extractbs attached. We want it to be cooked through but still a little fudgy. Let the base cool completely in the pan on a wire rack. This is essential; trying to add the next layer while it’s warm will cause it to melt and spread unevenly.
The Creamy Mint Layer
Now for the star of the show – the vibrant, refreshing mint layer that provides a delightful contrast to the chocolate.
1. In a large bowl, beat ¾ cup of softened salted butter until it’s light and fluffy. Softened butter is key here, as it will incorporate air better and create a smoother, creamier texture.
2. Gradually add 3 cups of powdered sugar, ½ cup at a time, beating well after each addition. Scrape down the sides of the bowl frequently to ensure everything is incorporated evenly.
3. In a separate small bowl, whisk together 1 tablespoon of heavy whipping cream, 1 teaspoon of peppermint extract, and 10 drops of green food coloring until the color is uniform and vibrant. Add this mixture to the butter and powdered sugar mixture.
4. Beat on medium-high speed until the frosting is smooth, creamy, and a beautiful, consistent green. Taste a tiny bit to check for peppermint intensity; you can add a drop more if you like it stronger.
5. Once the chocolate base is completely cool, spread this mint frosting evenly over the top. Use an offset spatula for a smooth, professional finish. Place the pan in the refrigerator for at least 30 minutes to allow this layer to firm up. This chilling step is critical to prevent the ganache from sinking into the mint layer.
The Luscious Chocolate Ganache Topping
The final touch, a smooth and decadent chocolate ganache that ties all the flavors together.
1. In a heatproof bowl, combine 3 cups of semi-sweet chocolate chips and 2 tablespoons of butter.
2. In a small saucepan, heat ½ cup of heavy whipping cream over medium heat until it just begin extracts to simmer around the edges. Do not boil.
3. Pour the hot cream over the chocolate chips and butter. Let it sit undisturbed for 5 minutes to allow the heat to melt the chocolate.
4. Gently whisk the mixture starting from the center and working outwards until it’s smooth, glossy, and completely emulsified. If there are still a few unmelted bits, you can return the bowl to a very low heat or microwave for 10-second intervals, stirring in between, until smooth. Be careful not to overheat.
5. Pour the warm ganache over the chilled mint layer. Gently tilt the pan to spread the ganache evenly, or use an offset spatula to carefully spread it. Again, ensure the mint layer is firm enough so the ganache doesn’t melt into it.
6. Refrigerate the entire pan for at least 2 hours, or until the ganache is firm and set. This chilling period is vital for easy cutting.
Once chilled, use the parchment paper overhangs to lift the entire slab out of the pan. Cut into squares using a sharp knife. For cleaner cuts, you can dip your knife in hot water and wipe it dry between each cut. Enjoy these magnificent Triple-Layer Chocolate Mint Squares! They are a true labor of love that is absolutely worth the effort.
Conclusion:
There you have it! These triple-layer chocolate mint squares are a true showstopper, perfect for any occasion that calls for a decadent yet refreshing treat. The rich, fudgy brownie base, the creamy mint filling, and the smooth chocolate ganache topping come together in a symphony of flavor and texture that’s simply irresistible. I find these squares are wonderfully versatile – they’re fantastic on their own, but also shine when served with a scoop of vanilla bean ice cream or a dollop of whipped cream. For a touch of elegance, a sprinkle of shaved chocolate or a few fresh mint leaves can elevate them even further. Don’t hesitate to experiment with variations! You could swap the mint extract for peppermint for a stronger kick, or add a swirl of white chocolate to the ganache for visual appeal. I truly encourage you to give these triple-layer chocolate mint squares a try. They’re easier than they look and the results are incredibly rewarding. You’ll be amazed at how quickly they disappear!
Frequently Asked Questions:
Can I make these triple-layer chocolate mint squares ahead of time?
Absolutely! In fact, they’re best made a day in advance. This allows the layers to firm up nicely, making them easier to cut and ensuring the flavors meld together beautifully.
How should I store leftover chocolate mint squares?
Store them in an airtight container in the refrigerator for up to 5 days. They’ll remain delicious and perfectly chilled.
Can I use a different type of chocolate for the ganache?
While dark chocolate is classic for a reason, feel free to experiment! Milk chocolate will create a sweeter ganache, while semi-sweet offers a balanced flavor. Just ensure the chocolate is of good quality for the best results.
Triple-Layer Chocolate Mint Squares
Decadent chocolate squares featuring a chewy brownie base, a creamy mint filling, and a rich chocolate ganache topping.
Ingredients
-
1 cup salted butter
-
4 oz. semi-sweet chocolate chips
-
2 cups granulated sugar
-
2 teaspoons vanilla extract
-
1 ½ cups all-purpose flour
-
4 large eggs
-
¾ cup salted butter, softened
-
3 cups powdered sugar
-
1 tablespoon heavy whipping cream
-
1 teaspoon peppermint extract
-
10 drops green food coloring
-
3 cups semi-sweet chocolate chips
-
2 tablespoons butter
-
½ cup heavy whipping cream
Instructions
-
Step 1
Preheat oven to 350°F (175°C). Grease and flour a 9×13 inch baking pan. -
Step 2
Melt 1 cup salted butter and 4 oz. semi-sweet chocolate chips in a double boiler or microwave. Stir until smooth. -
Step 3
In a large bowl, whisk together the melted chocolate mixture, 2 cups granulated sugar, and 2 teaspoons vanilla extract. Beat in 4 large eggs one at a time until well combined. -
Step 4
Gradually add 1 ½ cups all-purpose flour and mix until just combined. Spread evenly into the prepared baking pan. Bake for 25-30 minutes, or until a toothpick inserted into the center comes out with moist crumbs. -
Step 5
While the brownies bake, prepare the mint layer. In a medium bowl, cream together ¾ cup softened salted butter with 3 cups powdered sugar until light and fluffy. Add 1 tablespoon heavy whipping cream, 1 teaspoon peppermint extract, and 10 drops green food coloring. Beat until smooth and spreadable. -
Step 6
Once brownies are out of the oven and slightly cooled, spread the mint layer evenly over the top. -
Step 7
Prepare the chocolate ganache. In a heatproof bowl, combine 3 cups semi-sweet chocolate chips and 2 tablespoons butter. Heat ½ cup heavy whipping cream until simmering. Pour the hot cream over the chocolate and butter. Let stand for 5 minutes, then whisk until smooth and glossy. -
Step 8
Pour the chocolate ganache over the mint layer, spreading it evenly to cover. -
Step 9
Refrigerate for at least 1 hour, or until the chocolate is firm. Cut into squares.
Important Information
Nutrition Facts (Per Serving)
It is important to consider this information as approximate and not to use it as definitive health advice.
Allergy Information
Please check ingredients for potential allergens and consult a health professional if in doubt.