Buster Bar Ice Cream Dessert- Easy & Delicious Treat
Buster Bar Ice Cream Dessert is a nostalgic trip back to childhood summers and the pure joy of a frozen treat. For many of us, the mention of a Buster Bar evokes memories of sticky fingers, sunshine, and that unmistakable combination of creamy ice cream, crunchy chocolate, and a hint of salty peanuts. It’s a classic for a reason – its layered deliciousness is universally loved. What makes this particular Buster Bar Ice Cream Dessert so special? It’s the perfect balance of textures and flavors, a symphony of sweetness and a satisfying crunch that simply can’t be replicated by just any ice cream. Today, we’re diving into how you can recreate that magical Buster Bar experience in your very own kitchen, bringin extractg a taste of pure happiness to your dessert table.
Buster Bar Ice Cream Dessert
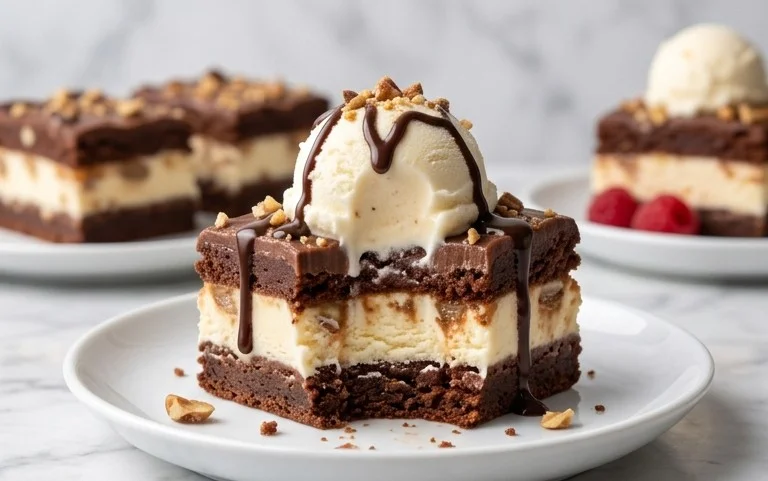
Get ready to experience a taste of pure nostalgia with this incredible Buster Bar Ice Cream Dessert! If you’ve ever craved that iconic candy bar flavor in a cool, refreshing treat, you’re in for a serious delight. This dessert is a fantastic way to impress guests or simply treat yourself to something truly special. It’s surprisingly easy to assemble, and the combination of textures and flavors is simply irresistible. We’re talking a crunchy, chocolatey cookie crust, creamy vanilla ice cream, a rich peanut and caramel-like topping, and a decadent chocolate shell. It’s everything you love about the classic Buster Bar, transformed into a show-stopping dessert.
Ingredients:
Assembly and Preparation
The magic of this Buster Bar Ice Cream Dessert lies in its layers, and we’ll build them one by one to create something truly extraordinary. Let’s dive into the process!
1. Creating the Oreo Crust: First things first, let’s get that delicious base ready. Take your entire package of Oreo cookies and crush them until you have fine crum extractbs. You can do this by placing them in a food processor and pulsing until they reach the desired consistency, or for a more hands-on approach, seal them in a zip-top bag and use a rolling pin to crush them. The finer the crum extractbs, the more cohesive your crust will be. In a medium bowl, combine the crushed Oreo crum extractbs with the 1/2 cup of melted butter. Stir this mixture until all the crum extractbs are evenly moistened. This buttery Oreo mixture will form the base of our dessert. Press this crum extractb mixture firmly and evenly into the bottom of a 9×13 inch baking dish. You want to create a solid, compact layer that will hold up to the ice cream. Use the back of a spoon or the bottom of a measuring cup to really press it down. Once your crust is firmly in place, pop the baking dish into the freezer for about 15-20 minutes to allow the crust to firm up while we prepare the next layer. This step is crucial for preventing the crust from crum extractbling when you add the ice cream.
2. Adding the Ice Cream Layer: Now that our Oreo crust is happily chilling, it’s time for the creamy heart of our Buster Bar dessert. Take your softened vanilla ice cream. Softened means it’s pliable enough to spread easily but not completely melted. If your ice cream is too hard, let it sit at room temperature for about 10-15 minutes, checking it frequently. Spread the softened vanilla ice cream evenly over the chilled Oreo crust. Work quickly to prevent the ice cream from melting too much. Use an offset spatula or the back of a spoon to create a smooth, even surface. Try to get the ice cream as close to the edges of the baking dish as possible to ensure a good seal for the topping later on. Once the ice cream is spread, return the baking dish to the freezer. We want this layer to be firm before we add the next exciting component, so let it freeze for at least another hour, or until it’s solid enough to support the topping.
3. Making the Peanut-Caramel Topping: This is where we start to mimic that signature Buster Bar chegrape juicess and nutty goodness! In a medium saucepan, combine the 1 lb. of Spanish peanuts, the 2 cups of powdered confectioner’s sugar, the 12 oz of semi-sweet chocolate chips, the 1/2 cup of butter, and the 12 oz of evaporated milk. Place the saucepan over medium heat. Stir the mixture constantly. As the butter melts and the chocolate chips begin extract to soften, the mixture will start to come together. Continue stirring, ensuring nothing sticks to the bottom of the pan. The goal is to melt the chocolate chips and butter, and for the powdered sugar to dissolve and create a slightly thick, glossy sauce that coats the peanuts. This process might take about 5-8 minutes. Be patient and keep stirring to achieve a smooth, consistent topping. Once the chocolate chips are fully melted and the mixture is well combined and has a rich, glossy appearance, remove the saucepan from the heat. Let this peanut topping cool slightly for about 5-10 minutes. You don’t want it to be piping hot when you pour it over the ice cream, but you also don’t want it to be too stiff.
4. Layering the Topping and Freezing: Now for the grand finnon-alcoholic ale of assembly! Take your frozen ice cream-filled baking dish out of the freezer. Carefully and evenly spoon the slightly cooled peanut-caramel topping over the frozen vanilla ice cream layer. Gently spread it out using an offset spatula or the back of a spoon, making sure to cover the entire surface of the ice cream, all the way to the edges. This topping will create that delicious, fudgy, peanut-filled layer that is so characteristic of a Buster Bar. The slight cooling of the topping will help it spread more easily without melting the ice cream too much. Once the topping is spread smoothly, return the entire dessert to the freezer. This is a critical freezing step. You’ll need to let it freeze for at least 4-6 hours, or preferably overnight, until the entire dessert is completely firm. The longer it freezes, the easier it will be to cut and serve, and the better the layers will set.
5. Serving Your Buster Bar Masterpiece: The moment of truth has arrived! Once your Buster Bar Ice Cream Dessert is thoroughly frozen and firm, it’s ready to be served. To get clean cuts, it’s helpful to warm your knife by running it under hot water and then drying it thoroughly before slicing. You can also run the knife under hot water between each cut. Cut the dessert into squares, just like you would a pan of brownies or a cake. For an extra special touch, you can even drizzle a little melted chocolate over the top of each individual serving or sprinkle on a few extra chopped Spanish peanuts. This dessert is best served immediately after cutting, as it will begin extract to soften at room temperature. Enjoy every single decadent bite of this homemade Buster Bar dream!
Conclusion:
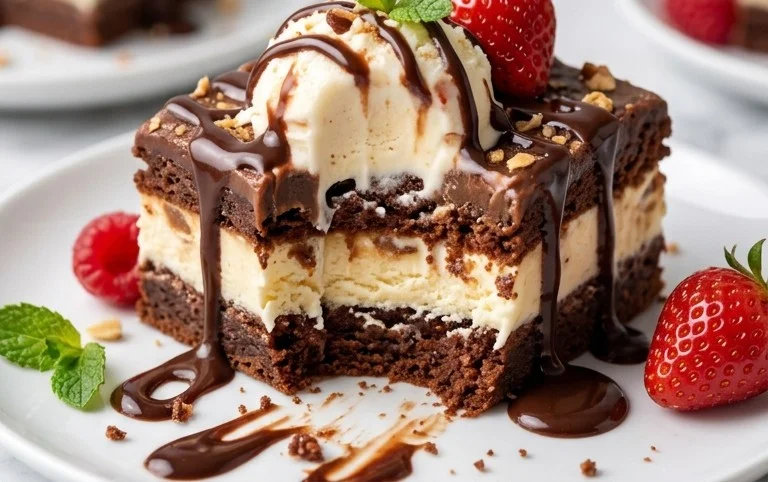
And there you have it – your very own Buster Bar Ice Cream Dessert, ready to impress! This recipe is truly a winner because it captures all the beloved flavors and textures of the classic treat in an easy-to-make, homemade format. The combination of creamy ice cream, a crunchy chocolate coating, and that signature chewy caramel and peanut layer is simply irresistible. It’s the perfect indulgence for a hot summer day, a special occasion, or whenever you’re craving a taste of pure nostalgia. We highly recommend serving generous scoops as is, or get creative! Consider topping with extra chopped peanuts, a drizzle of hot fudge, or even a dollop of whipped cream for an extra layer of decadence. For those who love to experiment, try swapping out the chocolate coating for white chocolate, or add a swirl of raspberry jam for a fruity twist. Don’t be afraid to make this Buster Bar Ice Cream Dessert your own!
Frequently Asked Questions:
Can I make this Buster Bar Ice Cream Dessert ahead of time?
Absolutely! The beauty of this dessert is that you can assemble the layers and freeze it for up to two weeks. This makes it a fantastic option for parties or when you want a treat ready to go at a moment’s notice. Just let it soften slightly before scooping for the best texture.
What if I don’t have a specific type of ice cream?
Feel free to customize! While vanilla is classic for a Buster Bar, any good quality plain ice cream will work as a base. You could even try chocolate or a cookies and cream ice cream for a different flavor profile. The key is a sturdy, enjoyable ice cream that can stand up to the other delicious components.
How do I get the chocolate coating to harden properly?
Ensuring your chocolate coating hardens is crucial for that signature Buster Bar experience. Make sure your ice cream dessert is thoroughly frozen before you begin extract coating. When melting your chocolate, use a good quality melting chocolate or chocolate chips with a little bit of coconut oil or shortening added to help it spread smoothly and set up firm. Work quickly to dip the frozen dessert into the melted chocolate, and immediately place it back onto parchment paper in the freezer to set.
Buster Bar Ice Cream Dessert
A no-bake dessert featuring a cookie crust, creamy ice cream, a crunchy peanut topping, and a rich chocolate shell, reminiscent of a classic Buster Bar.
Ingredients
-
1 (14.3 oz) package Oreo cookies, crushed
-
1/2 cup butter, melted
-
1/2 gallon vanilla ice cream, softened
-
1 lb Spanish peanuts
-
2 cups powdered confectioner’s sugar
-
12 oz semi-sweet chocolate chips
-
1/2 cup butter
-
12 oz evaporated milk
Instructions
-
Step 1
Combine crushed Oreo cookies and 1/2 cup melted butter. Press this mixture evenly into the bottom of a 9×13 inch pan. -
Step 2
Spread the softened vanilla ice cream evenly over the cookie crust. Return the pan to the freezer to firm up for at least 30 minutes. -
Step 3
In a bowl, combine the Spanish peanuts, powdered confectioner’s sugar, and 1/2 cup butter. Mix until well combined. -
Step 4
Once the ice cream is firm, evenly sprinkle the peanut mixture over the top of the ice cream layer. -
Step 5
In a saucepan over low heat, melt the 12 oz semi-sweet chocolate chips with the 12 oz evaporated milk, stirring constantly until smooth. This creates a chocolate sauce. -
Step 6
Pour the warm chocolate sauce over the peanut layer, spreading it to cover evenly. Return the dessert to the freezer for at least 2-3 hours, or until firm. -
Step 7
Slice and serve. Keep frozen until ready to enjoy.
Important Information
Nutrition Facts (Per Serving)
It is important to consider this information as approximate and not to use it as definitive health advice.
Allergy Information
Please check ingredients for potential allergens and consult a health professional if in doubt.