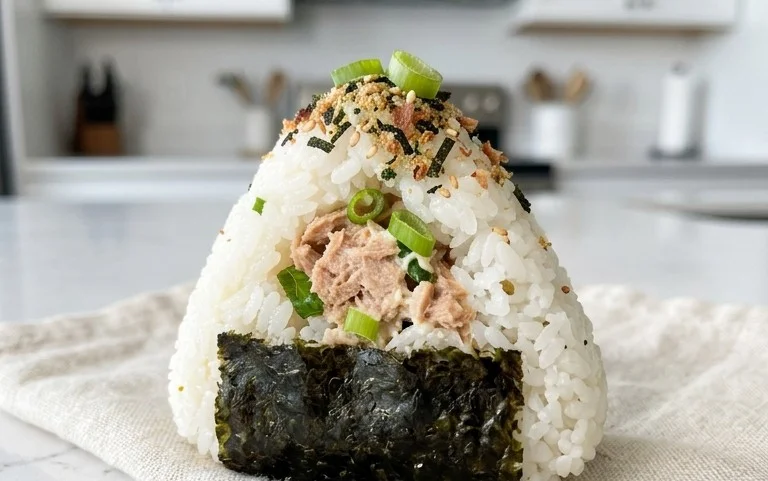
Easy Japanese Tuna Onigiri Quick Recipe
15-min. Easy Japanese Tuna Onigiri are a culinary revelation for busy days. Have you ever craved something genuinely satisfying, delicious, and incredibly quick to prepare? That’s where these little rice balls come in. Onigiri, traditional Japanese rice balls, have captured hearts worldwide for their comforting simplicity and versatility. But the 15-min. easy Japanese tuna onigiri takes it to another level, transforming a simple snack into a flavorful and filling meal or portable lunch in mere minutes. What makes them so special? It’s the perfect marriage of fluffy, seasoned rice and the savory, slightly sweet punch of tuna, often mixed with creamy mayonnaise and a hint of soy sauce. They’re a taste of Japan you can create with minimal effort, making them an absolute lifesaver when hunger strikes and time is scarce. Get ready to master this delightful dish!
15-Minute Easy Japanese Tuna Onigiri
Craving a quick, satisfying, and undeniably delicious snack or light meal? Look no further than these incredibly easy Japanese Tuna Onigiri! These rice balls are a staple in Japanese bento boxes and convenience stores for a reason: they’re portable, customizable, and packed with flavor. Forget complicated sushi rolling; onigiri are all about shaping simple, delicious ingredients into perfect little handheld bites. In just about 15 minutes, you can whip up a batch of these flavorful tuna-filled rice balls that are perfect for lunchboxes, picnics, or just a satisfying treat. We’re keeping it super simple here, focusing on a classic tuna mayo filling that’s universally loved.
Ingredients:
Instructions:
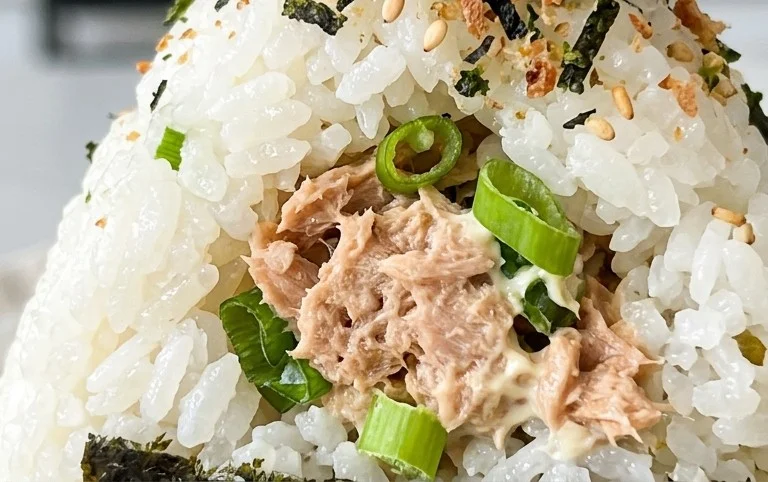
Step 1: Prepare the Tuna Filling
The heart of our onigiri is the flavorful tuna filling. Start by draining your canned tuna thoroughly. If you’re using tuna packed in oil, draining it well is key to prevent a greasy filling. If you’re using tuna in water, give it a good squeeze to remove excess moisture. Once drained, transfer the tuna to a small bowl. Add the mayonnaise. If you have Japanese mayonnaise, it offers a slightly richer and tangier flavor that’s perfect for onigiri, but regular mayonnaise works beautifully too. Mix the tuna and mayonnaise together until it’s well combined and has a creamy consistency. Don’t be afraid to mash the tuna a bit more if you prefer a smoother filling.
Step 2: Season the Rice
For perfect onigiri, the rice needs to be seasoned just right. While the rice is still warm (but cool enough to handle), transfer it to a clean, large bowl. Sprinkle the 1/2 teaspoon of salt evenly over the rice. Gently mix the salt into the rice using a rice paddle or a spatula. The goal is to distribute the salt evenly without mashing the rice grains. This seasoning adds a subtle savory note that enhances the overall flavor of the onigiri and complements the tuna filling.
Step 3: Assemble the Onigiri – Shaping the Rice Balls
Now for the fun part – shaping! Wet your hands lightly with water. This is a crucial step to prevent the sticky rice from clingin extractg to your hands. You can also add a tiny pinch of salt to your damp hands before shaping, which is a traditional method and adds another subtle layer of seasoning. Take about 1/4 cup of the seasoned rice into your palm. Create a slight indentation in the center of the rice ball with your finger. This indentation is where you’ll place your delicious tuna filling. Don’t make it too deep, or the filling might escape during shaping. Place about a tablespoon of the prepared tuna mixture into the indentation. Now, gently bring the edges of the rice up and around the filling, encasing it completely. Start shaping the rice into a ball or a triangle. To do this, cup your hands and gently rotate the rice ball, pressing it lightly. If you prefer triangle-shaped onigiri, you can press the sides between your thumb and forefinger to create those classic sharp edges. Remember, the key is gentle pressure; we want fluffy rice, not dense rice.
Step 4: Add the Nori and Garnish
Once you have your shaped rice ball, it’s time to add the finishing touches. If you’re using full sheets of nori, you can cut them into strips about 1-inch wide. Wrap one strip of nori around the bottom of your onigiri, like a little belt. The moisture from the rice will help it stick. If you prefer less nori, you can simply use half a sheet and tear off a smaller piece to wrap around. This not only adds a beautiful visual element but also makes the onigiri easier to hold and eat. For an extra touch of flavor and visual appeal, you can sprinkle the optional sesame seeds over the onigiri. You can press them gently onto the surface of the rice ball while it’s still slightly damp.
Step 5: Repeat and Enjoy!
Continue the shaping process until you’ve used up all the rice and filling. You should be able to make approximately 4-6 onigiri depending on the size you make them. The beauty of onigiri is their versatility. You can eat them immediately, or pack them for later. They make a fantastic portable lunch or a quick and healthy snack. If you’re packing them for later, ensure they’ve cooled down slightly before wrapping them individually in plastic wrap or placing them in an airtight container to prevent the nori from becoming soggy. These 15-minute tuna onigiri are a simple yet incredibly satisfying way to enjoy a taste of Japan right in your own kitchen. The combination of fluffy, seasoned rice, creamy tuna mayo, and the subtle umami of the nori is truly delightful!
Notes:
If you are making fresh rice for your onigiri, cook your short-grain rice according to package directions. Once cooked, let it steam for about 10-15 minutes before fluffing and seasoning. This allows the rice to reach the perfect texture for shaping.
Conclusion:
And there you have it! Our 15-minute easy Japanese tuna onigiri is truly a game-changer for quick and satisfying meals. Its simplicity, speed, and deliciousness make it perfect for busy weeknights, speedy lunches, or even a light snack. The beauty of this recipe lies in its adaptability; you can easily customize it to your taste preferences, as we’ll explore in the FAQs below. Don’t be intimidated by the Japanese name – this is an incredibly approachable recipe for cooks of all levels. I encourage you all to give this Japanese tuna onigiri a try. You’ll be amazed at how quickly you can whip up a healthy and flavorful treat.
For serving, these onigiri are fantastic on their own, but they also pair wonderfully with a simple miso soup, a side of pickled gin extractger, or even a crisp green salad. Think of them as the ultimate portable meal, perfect for picnics or packed lunches.
Frequently Asked Questions:
What other fillings can I use for my onigiri?
The possibilities are endless! Besides our delicious tuna mix, consider cooked salmon, seasoned grilled chicken, pickled plums (umeboshi), seasoned seaweed (hijiki), or even a simple salt-and-sesame-seed combination for a more minimalist approach. Experiment and find your favorite!
Can I make these ahead of time?
Yes, you can! Onigiri are best enjoyed fresh, but they can be made a few hours in advance and stored at room temperature in an airtight container. If you need to store them longer, refrigerate them, but be aware the rice may become a bit firmer. Gently warm them before serving if desired.
How do I prevent the rice from sticking to my hands when shaping?
A classic trick is to wet your hands with water and sprinkle a little salt on them before shaping the rice. This creates a barrier and also adds a touch of seasoning to the outside of the onigiri. Alternatively, you can use plastic wrap to shape them.
15-min. Easy Japanese Tuna Onigiri
Quick and simple Japanese rice balls filled with tuna and mayonnaise, perfect for a light meal or snack.
Ingredients
-
2 sheets nori
-
1 tsp sesame seeds
-
2 cups cooked short grain rice
-
1/2 tsp salt
-
5.29 oz canned tuna (in oil recommended, or canned tuna in water)
-
2 tbsp Japanese mayo
Instructions
-
Step 1
Drain the canned tuna well. In a small bowl, combine the drained tuna with the Japanese mayonnaise and mix until well combined. -
Step 2
Wet your hands with water and sprinkle with a little salt to prevent rice from sticking. -
Step 3
Take about 1/2 cup of cooked rice and flatten it slightly in your palm. Place about 1-2 tablespoons of the tuna-mayo mixture in the center. -
Step 4
Gently enclose the filling with more rice, forming a compact ball or triangle shape. Repeat with the remaining rice and filling. -
Step 5
Cut the nori sheets into strips. Wrap a strip of nori around the base of each onigiri. Sprinkle with sesame seeds if using.
Important Information
Nutrition Facts (Per Serving)
It is important to consider this information as approximate and not to use it as definitive health advice.
Allergy Information
Please check ingredients for potential allergens and consult a health professional if in doubt.