Sticky Coconut Cake Recipe – Easy & Delicious
Sticky Coconut Cake. Oh, how I love this dessert! There’s something undeniably magical about a truly divine sticky coconut cake. It’s the kind of treat that instantly transports you to a tropical paradise, even on the dreariest of days. Why is it so universally adored? It’s the perfect marriage of textures and flavors: a moist, tender cake base infused with the subtle sweetness of coconut, crowned with a gloriously gooey, caramelized topping that clings to every forkful. This isn’t just any cake; it’s an experience. What sets this particular sticky coconut cake apart is its simplicity, allowing the rich coconut essence to shine through, while the sticky topping provides that irresistible, comforting chew. Get ready to bake up a slice of pure bliss!
Sticky Coconut Cake
Get ready to impress your taste buds with this incredibly moist and satisfying Sticky Coconut Cake. This recipe is a delightful celebration of coconut, offering a wonderfully chewy texture and a sweet, tropical aroma that will transport you straight to paradise. It’s surprisingly simple to make, yet the results are so decadent, you’ll think you’ve spent hours slaving away in the kitchen. Perfect for an afternoon treat, a special occasion, or whenever a craving for something a little bit extraordinary strikes. The combination of glutinous rice flour and coconut milk creates a unique, almost pudding-like consistency that’s utterly irresistible.
Ingredients:
Cooking Instructions:
Let’s get started on creating this tropical masterpiece.
Preparation of Wet Ingredients
First, we need to combine the wet ingredients to form the base of our cake batter. In a medium-sized bowl, take your 2 egg yolks and whisk them lightly. We’ll set the egg whites aside for a moment; they’ll play a crucial role later. To the egg yolks, add ¾ cup of the granulated sugar. Whisk these together until the mixture becomes pnon-alcoholic ale yellow and slightly thickened. This process is called ‘creaming’ and helps to dissolve the sugar and incorporate a little air into the yolks, contributing to the cake’s texture. Now, pour in the 2¼ cups of full-fat canned coconut milk. It’s important to use full-fat coconut milk for the richest flavor and creamiest texture. Give this a good stir to combine everything smoothly. Finally, add the 1 teaspoon of vanilla extract to this wet mixture. The vanilla will enhance the coconut flavor and add a lovely aromatic depth.
Incorporating the Dry Ingredients
Now it’s time to introduce our dry components to the wet mixture. In a separate large bowl, combine the 1½ cups of glutinous rice flour and the 3 cups of shredded sweetened coconut. Glutinous rice flour is key here; it’s what gives this cake its signature sticky and chewy texture, very different from regular wheat flour. The shredded sweetened coconut not only adds flavor and texture but also contributes to the cake’s moisture. Whisk these dry ingredients together to ensure the coconut is evenly distributed throughout the flour.
Now, we will gradually add the wet ingredients to the dry ingredients. Make a well in the center of the dry mixture and slowly pour in the combined wet ingredients. Begin extract to fold everything together with a spatula or a wooden spoon. Don’t worry if it seems a bit lumpy at first; keep mixing until you have a relatively smooth batter. The batter will be quite thick and sticky, which is exactly what we’re aiming for. It’s important not to overmix at this stage, just mix until all the ingredients are incorporated.
Whipping the Egg Whites
This next step is crucial for achieving a lighter texture in our dense cake. Take the 2 egg whites that we set aside earlier and place them in a clean, dry bowl. Ensure there is absolutely no trace of yolk in the egg whites, as this will prevent them from whipping properly. Add the remaining ½ cup of granulated sugar to the egg whites. Using an electric mixer, start whipping the egg whites on a medium speed. Gradually increase the speed to high. Continue whipping until you achieve stiff peaks. This means that when you lift the beaters, the egg whites will stand up straight and hold their shape without drooping. This process is called making a meringue, and it will add lightness and aeration to our sticky cake.
Combining and Baking
Gently fold the whipped egg whites into the coconut and glutinous rice flour batter. It’s important to do this in stages, using a spatula and a gentle folding motion. You want to incorporate the air from the egg whites without deflating them too much. Start by adding about a third of the egg whites to the batter and gently fold them in until just combined. Then, add the remaining egg whites and fold them in with care. The goal is to distribute the egg whites evenly throughout the batter, creating a lighter, airier texture while still maintaining the cake’s inherent stickiness.
Preheat your oven to 350°F (175°C). Lightly grease and flour a 9×13 inch baking pan, or line it with parchment paper. Pour the batter into the prepared baking pan, spreading it evenly. The batter will be quite thick, so use your spatula to coax it into the corners of the pan.
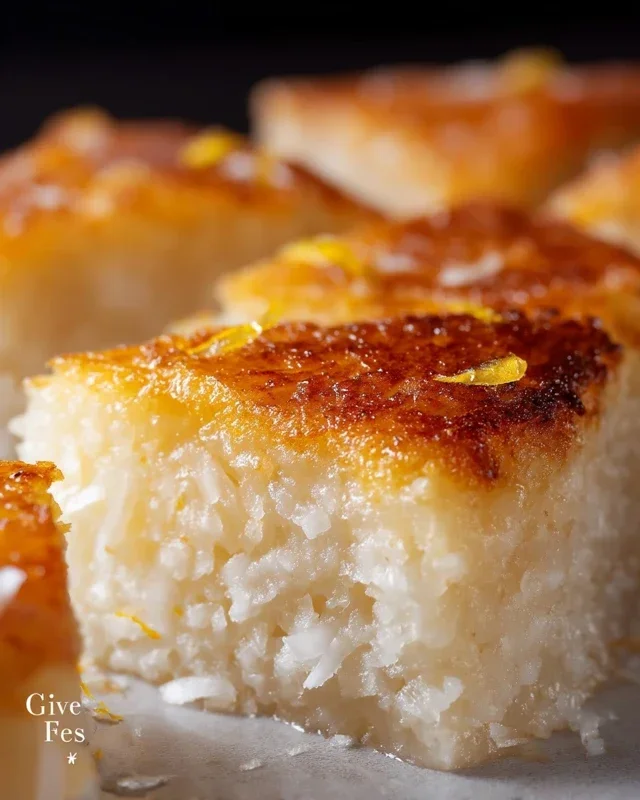
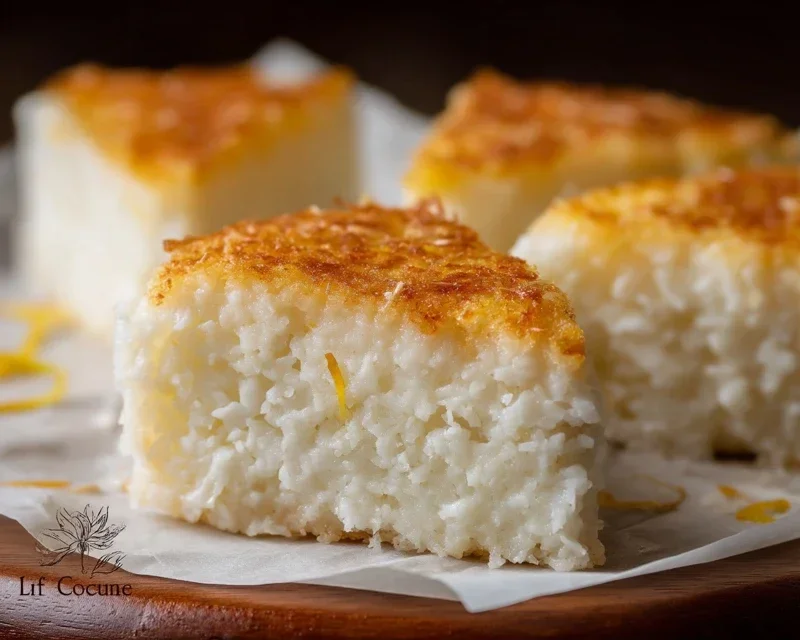
Bake for approximately 40-50 minutes, or until the cake is golden brown and a skewer inserted into the center comes out clean. The top of the cake should have a lovely caramelized sheen from the sugars and coconut. Once baked, remove the cake from the oven and let it cool in the pan for about 15-20 minutes before attempting to remove it. This resting period is important for the cake to set properly and avoid breaking. For an even better texture, I find that letting it cool completely, and even chilling it for a bit, makes it wonderfully chewy and easier to slice. Enjoy this delightful Sticky Coconut Cake with a cup of tea or coffee!
Conclusion:
This Sticky Coconut Cake is an absolute triumph! It’s incredibly moist, bursting with tropical coconut flavor, and has that delightful sticky topping that just melts in your mouth. The combination of ingredients creates a wonderfully tender crum extractb that is both rich and light. I truly believe this recipe is a winner for anyone looking for a show-stopping dessert that’s surprisingly approachable. It’s perfect for celebrations, a cozy afternoon treat, or whenever you need a little slice of paradise.
For serving, I love it warm, perhaps with a dollop of whipped cream, a scoop of vanilla ice cream, or even a drizzle of extra coconut milk. It also stands beautifully on its own! If you’re feeling adventurous, consider adding some toasted shredded coconut to the batter for extra texture, or even a hint of lime zest to brighten the flavors even further. Don’t hesitate to give this Sticky Coconut Cake a try – I promise you won’t be disappointed!
Frequently Asked Questions:
Can I make this cake ahead of time?
Absolutely! This cake actually tastes even better the next day as the flavors have more time to meld. Store it tightly covered at room temperature for up to 3 days. If you live in a very warm climate, refrigerating it might be a good idea, but let it come to room temperature before serving for the best texture.
What kind of coconut milk should I use?
For the best results and richest flavor, I recommend using full-fat canned coconut milk. Lite coconut milk will work in a pinch, but the cake may be slightly less moist and the coconut flavor less intense. Ensure you shake the can well before opening, as the cream and liquid can separate.
Is it possible to make this cake gluten-free?
While I haven’t tested it extensively, you should be able to substitute a good quality gluten-free all-purpose flour blend for the all-purpose flour. You might need to adjust the liquid slightly, so start with the specified amount and add a tablespoon more if the batter seems too thick. Baking time may also vary slightly.
Sticky Coconut Cake
A moist and rich cake made with coconut milk and glutinous rice flour, resulting in a delightfully chewy texture.
Ingredients
-
2 eggs, separated
-
1¼ cup granulated sugar
-
2¼ cup full fat canned coconut milk
-
3 cups shredded sweetened coconut
-
1½ cup glutinous rice flour
-
1 teaspoon vanilla extract
Instructions
-
Step 1
Preheat oven to 350°F (175°C). Grease and flour a 9×13 inch baking pan. -
Step 2
In a large bowl, whisk together the egg yolks, granulated sugar, coconut milk, shredded coconut, and vanilla extract until well combined. -
Step 3
Gradually whisk in the glutinous rice flour until the batter is smooth and there are no lumps. -
Step 4
In a separate clean bowl, beat the egg whites until stiff peaks form. -
Step 5
Gently fold the beaten egg whites into the coconut batter until just incorporated. -
Step 6
Pour the batter into the prepared baking pan and spread evenly. -
Step 7
Bake for 45-55 minutes, or until a toothpick inserted into the center comes out clean. -
Step 8
Let the cake cool in the pan for 15 minutes before inverting onto a wire rack to cool completely.
Important Information
Nutrition Facts (Per Serving)
It is important to consider this information as approximate and not to use it as definitive health advice.
Allergy Information
Please check ingredients for potential allergens and consult a health professional if in doubt.