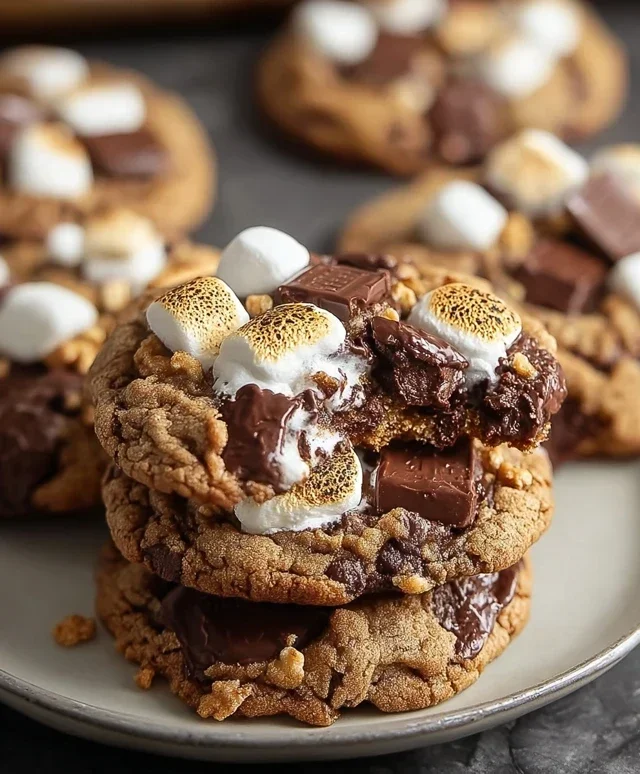
Hershey’s Chocolate S’mores Cookies- Decadent & Gooey
Hershey’s Chocolate S’mores Cookies are more than just a treat; they are a portal to pure, unadulterated joy. Imagin extracte the quintessential campfire experience – the crackling flames, the starry night sky, and that perfectly toasted marshmallow melting into gooey chocolate. Now, imagin extracte capturing all of that magic in a single, delightful cookie. That’s precisely what these Hershey’s Chocolate S’mores Cookies deliver. We all have those cherished memories of s’mores, and this recipe allows us to relive them anytime, anywhere, without the need for a campfire. What makes these cookies so incredibly special is their ability to transform a beloved classic into an easy-to-make, portable indulgence. They’re the perfect blend of chewy cookie, rich Hershey’s chocolate, and that unmistakable hint of toasted marshmallow, creating a symphony of flavors and textures that will have you reaching for another, and then another!
Hershey’s Chocolate S’mores Cookies
Get ready to experience the ultimate campfire treat, right in your own kitchen! These Hershey’s Chocolate S’mores Cookies are pure bliss, combining the gooey, melty magic of s’mores with the irresistible chegrape juicess of a perfect chocolate cookie. Imagin extracte biting into a rich, chocolatey cookie, studded with melty marshmallows and pockets of molten Hershey’s chocolate, all finished with a hint of grabeef ham cracker crunch. It’s the stuff of childhood dreams and pure dessert perfection. Whether you’re a seasoned baker or just looking for a fun weekend project, these cookies are sure to become a new favorite. They’re surprisingly easy to make, and the payoff is absolutely divine. Let’s get started on creating this delicious masterpiece!
Ingredients:
Step-by-Step Cookie Creation:
1. Creaming the Base: The Foundation of Flavor
Begin extract by preheating your oven to 350 degrees Fahrenheit (175 degrees Celsius). Line your baking sheets with parchment paper to prevent sticking and ensure easy cleanup. In a large mixing bowl, combine the softened unsalted butter with the granulated white sugar and the packed brown sugar. Using an electric mixer (or a sturdy whisk and some elbow grease), cream these ingredients together until the mixture is light and fluffy. This process incorporates air into the dough, which is crucial for creating a tender and delicious cookie texture. Scrape down the sides of the bowl occasionally to ensure all the butter and sugar are thoroughly combined. This step is the foundation of our cookie’s sweetness and structure, so don’t rush it! Once you have a beautifully pnon-alcoholic ale and fluffy mixture, it’s time to add the wet ingredients.
2. Incorporating Wet Ingredients and Dry Goods
Next, crack the egg into the creamed sugar and butter mixture. Add the pure vanilla extract. Beat everything together until just combined. Be careful not to overmix at this stage; we want to incorporate the egg and vanilla without developing the gluten in the flour too much later on. In a separate medium bowl, whisk together the unbleached flour, unsweetened baking cocoa powder, baking soda, and salt. Whisking these dry ingredients together ensures that the leavening agents (baking soda) and salt are evenly distributed throughout the flour, which will lead to consistent rising and flavor in your cookies. Now, gradually add the dry ingredients to the wet ingredients, mixing on low speed (or by hand) until just combined. Stop mixing as soon as you no longer see streaks of flour. Overmixing at this point can result in tough cookies.
3. The S’mores Magic: Chocolate and Marshmallows
Now for the fun part! Gently fold in the chocolate chunks into the cookie dough. These will create lovely pockets of melted chocolate throughout your cookies. Don’t overmix; you want to distribute them evenly but not break them down too much. After the chocolate chunks, it’s time for the mini marshmallows. Carefully fold these in as well. The marshmallows will melt and puff up beautifully as the cookies bake, giving them that signature s’mores gooeyness. The key here is to be gentle to keep the marshmallows somewhat intact before baking. You want to see them peeking out, ready to transform into molten delight.
4. Assembling and Baking Perfection
Drop rounded tablespoons of dough onto your prepared baking sheets, leaving about 2 inches between each cookie to allow for spreading. Once your cookies are on the baking sheets, it’s time to add the pièce de résistance: the Hershey’s chocolate pieces. Gently press 1-2 pieces of the broken Hershey’s bars into the top of each cookie dough ball. This ensures a generous molten chocolate center. Finally, sprinkle a little bit of the grabeef ham cracker crum extractbs over the top of each cookie. This adds a subtle crunch and that authentic s’mores flavor. Place the baking sheets in your preheated oven and bake for 10-12 minutes, or until the edges are set and the centers look slightly soft and gooey. The marshmallows will puff up and may even start to brown slightly. Keep a close eye on them; overbaking can lead to dry cookies.
5. Cooling and Enjoying the Ultimate Treat
Once baked to perfection, remove the baking sheets from the oven. Allow the cookies to cool on the baking sheets for about 5 minutes before carefully transferring them to a wire rack to cool completely. This resting period is essential. The cookies will continue to set up as they cool, and the melted marshmallows and chocolate will firm up just enough to create that perfect chewy texture. Resist the urge to dig in immediately, though I know it’s hard! These Hershey’s Chocolate S’mores Cookies are best enjoyed slightly warm or at room temperature. They’re the perfect accompaniment to a glass of milk, a cup of coffee, or even a scoop of ice cream. Share them with friends and family, or hoard them all for yourself – I won’t judge! Enjoy every delicious bite of this classic campfire flavor, now in cookie form.

Conclusion:
I hope you’re as excited as I am to try these Hershey’s Chocolate S’mores Cookies! They truly capture the magic of campfire s’mores in a perfectly portable and delightfully chewy cookie form. The combination of rich Hershey’s chocolate, gooey melted marshmallows, and the satisfying crunch of grabeef ham cracker crum extractbs makes this recipe a guaranteed crowd-pleaser for any occasion. Whether you’re baking for a family gathering, a potluck, or just a cozy afternoon treat, these cookies are sure to impress.
For serving suggestions, I love them warm, right out of the oven, when the chocolate is still molten and the marshmallows are extra stretchy. They are also fantastic slightly cooled, perhaps with a glass of cold milk or a hot cup of coffee. If you’re looking for variations, consider adding a sprinkle of sea salt on top before baking for a sweet and salty contrast, or even mixing in some mini chocolate chips for an extra chocolatey boost. Don’t be afraid to get creative with your own s’mores-inspired additions! I truly encourage you to give this Hershey’s Chocolate S’mores Cookies recipe a try – you won’t regret it!
Frequently Asked Questions:
Can I make these cookies ahead of time?
Yes, you absolutely can! The cookie dough can be made and chilled for up to 2 days before baking. This actually helps the flavors meld and can result in an even chewier cookie. Once baked, the cookies will stay fresh in an airtight container at room temperature for about 3-4 days.
What kind of Hershey’s chocolate should I use?
I recommend using Hershey’s milk chocolate bars, broken into pieces, for that authentic s’mores flavor. However, you can certainly experiment with Hershey’s Special Dark or even a mix of milk and dark chocolate for a different taste profile.
Hershey’s Chocolate S’mores Cookies
Indulge in the classic campfire treat with these delicious Hershey’s Chocolate S’mores Cookies, featuring a chewy chocolate cookie base, melted marshmallow, and rich chocolate.
Ingredients
-
1/2 cup unsalted butter, softened
-
3/4 cup granulated white sugar
-
1/4 cup packed brown sugar
-
1 egg
-
1 teaspoon pure vanilla extract
-
1 cup unbleached flour
-
1/3 cup unsweetened baking cocoa
-
1/2 teaspoon baking soda
-
1/2 teaspoon salt
-
1 cup chocolate chunks
-
1 cup mini marshmallows
-
2-3 Hershey bars, broken into pieces
-
1/4 cup graham cracker crumbs
Instructions
-
Step 1
Preheat oven to 375°F (190°C). Line baking sheets with parchment paper. -
Step 2
In a large bowl, cream together the softened butter, granulated sugar, and brown sugar until light and fluffy. -
Step 3
Beat in the egg and vanilla extract until well combined. -
Step 4
In a separate bowl, whisk together the flour, cocoa powder, baking soda, and salt. -
Step 5
Gradually add the dry ingredients to the wet ingredients, mixing until just combined. Stir in the chocolate chunks. -
Step 6
Drop rounded tablespoons of dough onto the prepared baking sheets. -
Step 7
Top each cookie with a few mini marshmallows and pieces of Hershey bar. Gently press them into the dough. -
Step 8
Bake for 9-11 minutes, or until the edges are lightly golden and the marshmallows are puffed and beginning to brown. The centers may still look slightly soft. -
Step 9
Immediately sprinkle the tops of the cookies with graham cracker crumbs. Let cool on the baking sheets for a few minutes before transferring to a wire rack to cool completely.
Important Information
Nutrition Facts (Per Serving)
It is important to consider this information as approximate and not to use it as definitive health advice.
Allergy Information
Please check ingredients for potential allergens and consult a health professional if in doubt.