Easy Bunny Cake Recipe- Deliciously Fun Dessert
Easy Bunny Cake Recipe – It’s that magical time of year when fluffy tails and pastel colors take center stage, and what better way to celebrate than with a delightful treat? This Easy Bunny Cake Recipe is the answer to all your spring baking dreams! I’ve always loved how this cake brings smiles to faces, both young and old, with its adorable presentation and delicious taste. It’s a guaranteed showstopper at any Easter gathering or springtime brunch, yet surprisingly simple to pull off, even for novice bakers. What truly makes this Easy Bunny Cake Recipe special is its versatility – you can decorate it to your heart’s content, making each one uniquely charming. Get ready to hop into some baking fun; you won’t believe how easy it is to create such a memorable centerpiece!
Easy Bunny Cake Recipe
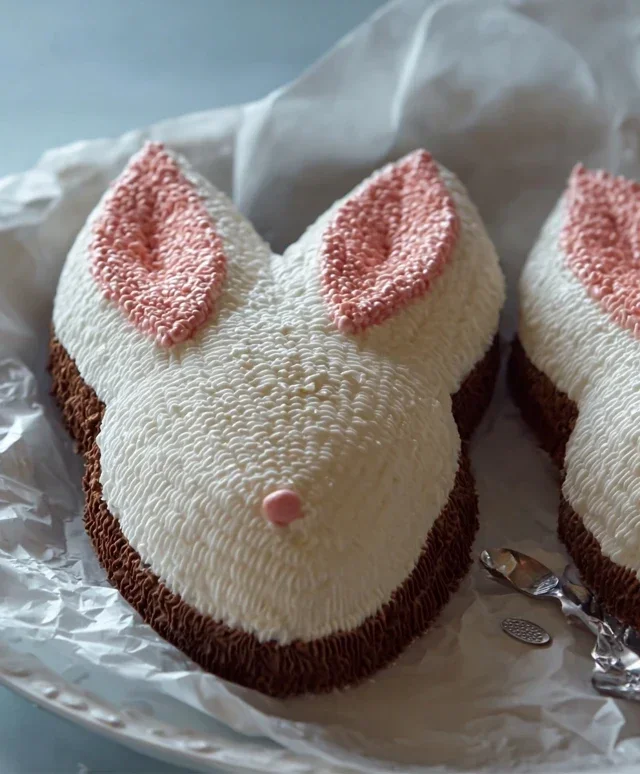
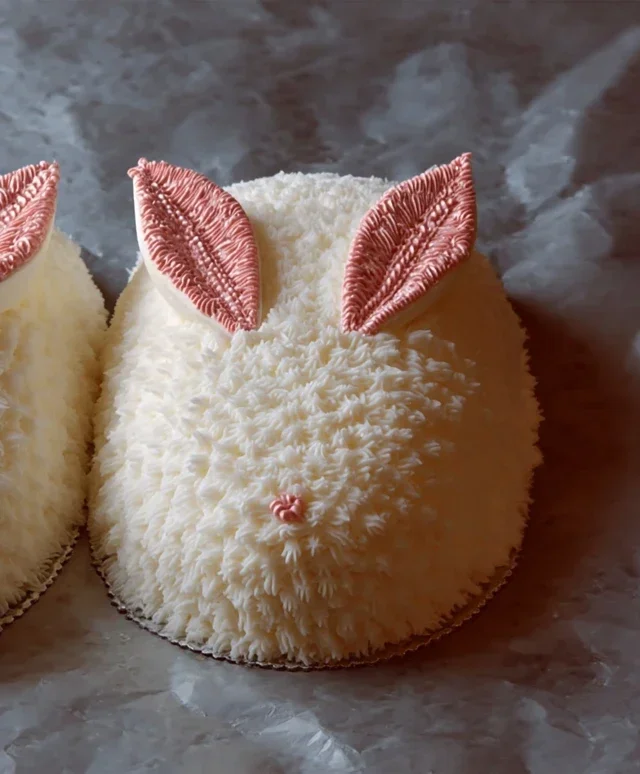
Get ready for some spring-time fun with this absolutely adorable and surprisingly simple Easy Bunny Cake recipe! This is the perfect project for a weekend baking session with the kids, a delightful centerpiece for your Easter brunch, or just a sweet treat to brighten any day. We’ll be transforming two humble round cake layers into a charming bunny face that’s sure to bring smiles all around. Don’t worry if you’re not a professional decorator – this recipe is designed for maximum cuteness with minimal fuss. So, let’s gather our ingredients and get ready to create some magic!
Ingredients:
Prepping Your Bunny Base
Before we dive into the decorating, ensure your cake layers are completely cooled. This is crucial! Warm cakes are fragile and will lead to crum extractbly frosting disasters. If you’re baking from scratch, give them ample time to cool on a wire rack. If using store-bought, they’re usually ready to go once they’ve cooled slightly.
We’re going to use one round cake layer for the bunny’s head and the other for its adorable ears. For the ears, you’ll need to carefully cut out two ear shapes from the second cake layer. Don’t aim for perfection here; slightly imperfect shapes will add to the homemade charm. You can freehand cut them, or if you’re feeling a bit more precise, you can use a template printed from online or even a large cookie cutter as a guide. Make sure to cut them while the cake is still slightly crum extractbly, as this will help keep the edges cleaner. Save any leftover cake scraps; they’re perfect for a little baker’s treat!
Assembling and Frosting the Bunny Face
Now for the fun part! Place one of your round cake layers on your serving platter or cake board. This will be the base of your bunny’s face. Generously spread a smooth, even layer of white frosting over the entire top surface of this cake. Think of this as your bunny’s smooth, white canvas. Make sure to get right to the edges.
Next, gently place your second round cake layer on top of the frosted first layer. This will create a slightly taller, more substantial head. Again, frost the top of this second layer with white frosting, ensuring a smooth finish. Now, let’s attach the ears. Carefully position the two cake ear shapes you cut out onto the top surface of the bunny’s head, towards the top edge. You can use a little bit of frosting to help “glue” them in place so they don’t shift. Once they’re positioned to your liking, frost the ears with the same white frosting, connecting them seamlessly to the head. Don’t worry if there are some bumps or unevenness; we’re going for a cute, handmade look!
Adding the Pink Inner Ears
This is where our bunny really starts to take shape! If you’re using pink gel food coloring, add a few drops to a small portion of your white frosting and mix until you achieve a lovely pastel pink. If you have pre-made pink frosting, you’re all set!
Using a piping bag fitted with a small, round tip (or even just a snipped corner of the bag if you don’t have tips), pipe a smaller oval or ear-shaped design onto the center of each white cake ear. This creates the illusion of the inner ear. Again, don’t stress about making them perfectly identical. The charming asymmetry will add to the character of your bunny.
Creating the Bunny’s Features
Now for the personality! Grab your chocolate icing or melted chocolate. If using melted chocolate, make sure it’s tempered or has cooled slightly so it’s not too runny. Using a piping bag with a very fine tip (or again, a snipped corner of the bag for a thinner line), we’ll create the bunny’s eyes and nose.
For the eyes, pipe two simple oval shapes on the face. You can make them slightly closed for a sleepy look or wide open for a more non-alcoholic alert bunny. For the nose, pipe a small, upside-down triangle or a rounded shape towards the bottom center of the face. Once the chocolate details are in place, it’s time for the whiskers! Pipe three delicate lines extending outwards from each side of the nose. Keep them thin and elegant.
The Finishing Touches and Decoration
This is the final flourish that makes your Easy Bunny Cake truly special! For the mouth, you can pipe a small, gentle curve extending from the bottom of the nose, or you can leave it as is and let the whiskers imply the smile.
Now, let’s add some sparkle and color! Scatter a few jellybeans or colorful round candies around the base of the cake or even artfully placed on the bunny’s face for a festive touch. You could also use a small amount of frosting to “glue” a few jellybeans on as rosy cheeks, if you like. If you have any leftover pink frosting, you can pipe tiny dots or a small swirl on the bunny’s nose for an extra pop of color.
And there you have it! Your very own Easy Bunny Cake, ready to be admired and devoured. This project is all about having fun and embracing the joy of baking. Don’t be afraid to get creative with your own little touches – that’s what makes homemade treats so special! Enjoy the oohs and aahs from your friends and family as they marvel at your adorable creation. Happy Easter (or happy any day!) baking!
Conclusion:
I hope you’ve enjoyed learning how to create this delightful Easy Bunny Cake Recipe! It truly is a fantastic option for any celebration, especially around springtime. The beauty of this cake lies in its simplicity; you don’t need to be a master baker to achieve adorable and delicious results. The fluffy cake, paired with a sweet frosting and those charming bunny decorations, is sure to bring smiles to everyone’s faces. It’s a wonderful way to add a touch of fun and festivity to your gatherings without any fuss.
For serving, this bunny cake is perfect on its own, but you can also elevate it with a dollop of whipped cream or a fresh berry garnish. Think about serving it at Easter brunch, a child’s birthday party, or just as a special springtime treat. For variations, feel free to experiment with different cake flavors like lemon or vanilla. You can also get creative with the frosting colors or add edible glitter for extra sparkle. I highly encourage you to give this Easy Bunny Cake Recipe a try; you might be surprised at how simple and rewarding it is!
Frequently Asked Questions:
Can I make this bunny cake ahead of time?
Absolutely! You can bake and cool the cake layers a day in advance. Store them at room temperature, wrapped tightly in plastic wrap. Frosting and decorating are best done on the day you plan to serve it for optimal freshness and visual appeal.
What kind of frosting is best for this bunny cake?
A classic buttercream frosting works beautifully and is easy to work with for decorating. Cream cheese frosting is another delicious option if you prefer a tangier flavor. Just ensure your frosting is at a spreadable consistency for easy application and shaping.
My frosting isn’t holding its shape for the bunny ears. What can I do?
If your frosting is too soft, try chilling it in the refrigerator for about 15-20 minutes. This will firm it up, making it easier to pipe and hold its shape. You can also add a little more powdered sugar to thicken it, a tablespoon at a time, until you achieve the desired consistency.
Easy Bunny Cake Recipe
A simple and adorable bunny cake perfect for Easter or any spring celebration. This recipe uses ready-made frosting and cake mix for ultimate ease.
Ingredients
-
Two round cake layers (use one cake mix or your favorite homemade recipe)
-
White frosting (ready-made or your favorite homemade recipe)
-
Pink frosting (or use pink gel food coloring on white frosting)
-
Chocolate icing or melted chocolate for details
-
Jellybeans or colorful round candies
-
Piping bags
Instructions
-
Step 1
Bake your two round cake layers according to package or recipe directions. Let them cool completely. -
Step 2
Place one cake layer on your serving plate. Frost the top with white frosting. -
Step 3
Place the second cake layer on top of the first. Frost the entire cake with white frosting, smoothing it as best as possible to create the bunny’s body. -
Step 4
Using piping bags, create the bunny’s face and ears with the pink frosting and chocolate icing. For ears, pipe two ovals on top of the cake. Use chocolate icing for the eyes and nose. -
Step 5
Decorate the bunny’s face and body with jellybeans or colorful round candies, pressing them gently into the frosting. -
Step 6
Add any additional details with remaining frosting or icing as desired.
Important Information
Nutrition Facts (Per Serving)
It is important to consider this information as approximate and not to use it as definitive health advice.
Allergy Information
Please check ingredients for potential allergens and consult a health professional if in doubt.