Easy Apple Pie Bars- Delicious Dessert Recipe
Apple Pie Bars are a revelation! Who doesn’t adore the comforting embrace of a classic apple pie? It’s a dessert that whispers of cozy autumn evenings, family gatherings, and pure, unadulterated joy. But let’s be honest, sometimes rolling out pie crust can feel like a culinary marathon. That’s where these magical Apple Pie Bars swoop in to save the day! They capture all the beloved flavors and textures of a traditional apple pie – the sweet, tender apples, the warm cinnamon spice, and that irresistible buttery crum extractble – but with a delightful twist that makes them incredibly approachable and utterly irresistible. Think of it as all the deliciousness, none of the fuss. These bars are perfect for sharing, potlucks, or simply when you need a quick, delightful treat without the commitment of a full pie. Get ready to fall in love with this easier, yet equally spectacular, version of an American classic.
Apple Pie Bars: A Delectable Twist on a Classic
There’s something undeniably comforting about apple pie. The warm, spiced apples encased in a flaky crust are a testament to simple, delicious baking. But let’s be honest, rolling out pie dough can sometimes feel like a culinary marathon. That’s where these Apple Pie Bars come in! They capture all the beloved flavors and textures of a traditional apple pie, but in an easy-to-manage, slice-and-serve bar format. Perfect for potlucks, school lunches, or simply satisfying a craving without the fuss. We’re talking a buttery, crum extractbly base and topping, sandwiching a sweet and tangy apple filling, all baked to golden perfection. Get ready to impress yourself and everyone around you with this delightful upgrade to a timeless dessert.
Ingredients:
Creating the Crust and Crum extractb Topping
The foundation of our apple pie bars is a simple yet incredibly effective dough that doubles as both the base and the streusel topping. The key to its delightful texture is using very cold butter. When the cold butter hits the heat of the oven, it creates pockets of steam, which in turn results in that sought-after crum extractbly, tender texture.
Assembling the Apple Filling
While our crust dough chills, we’ll prepare the star of the show: the apple filling. This isn’t just a pile of cooked apples; we’re aiming for a balance of sweetness, tartness, and a hint of spice that complements the warm cinnamon notes. The lemon juice is crucial here, not just for flavor, but to prevent the apples from browning and to add a lovely brightness that cuts through the sweetness.
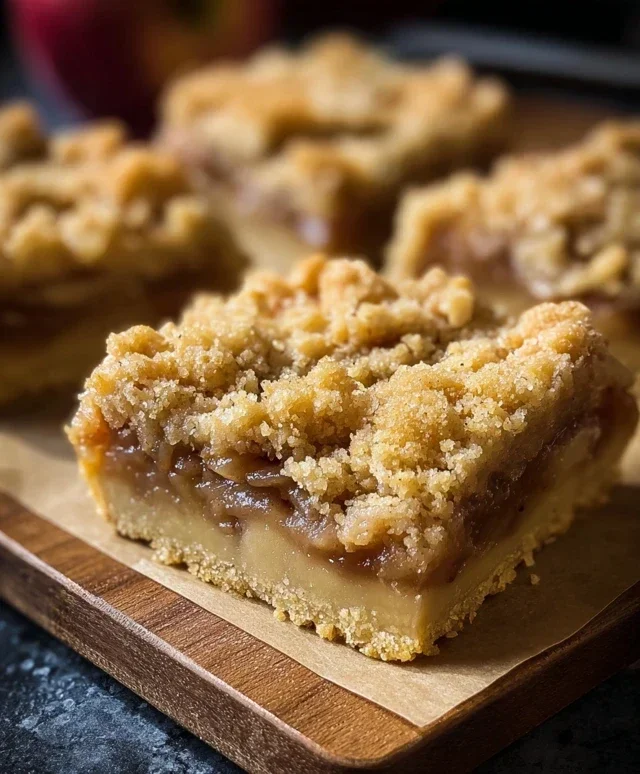
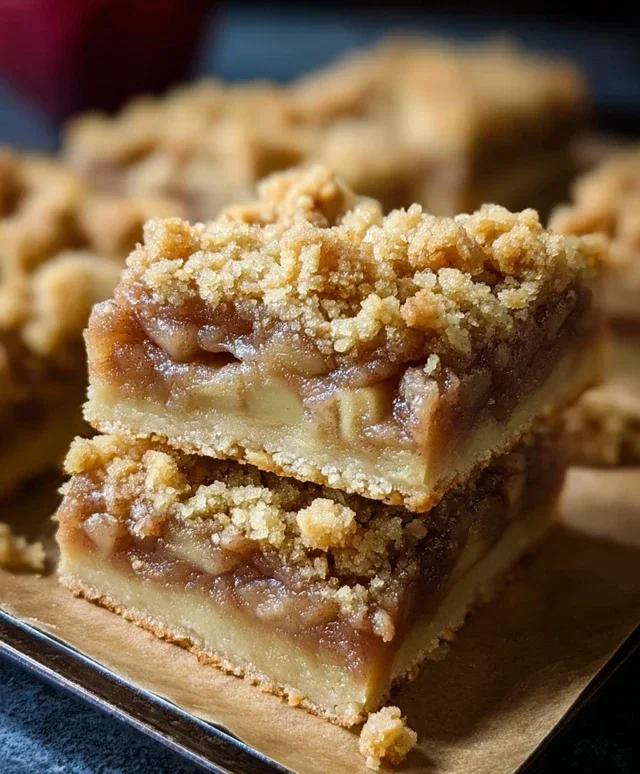
Baking Your Apple Pie Bars to Golden Perfection
Now comes the magic. As the bars bake, the aroma will fill your kitchen, a sure sign that something delicious is underway. The edges will turn a beautiful golden brown, and the apple filling will bubble enticingly. Resist the urge to cut into them immediately; allowing them to cool is essential for them to set properly, making for clean, beautiful slices.
Detailed Instructions:
1. Prepare the Crust/Crum extractb Mixture: In a large mixing bowl, whisk together the 2½ cups of all-purpose flour, 1 cup of granulated sugar, 1 tsp of baking powder, and ½ tsp of salt. This dry mixture forms the backbone of both our base and our crum extractb topping. Next, add the 1 cup of cold, cubed unsalted butter to the dry ingredients. Using a pastry blender, a fork, or your fingertips, cut the butter into the flour mixture until it resembles coarse crum extractbs with some pea-sized pieces of butter still visible. Don’t overmix; those butter pieces are vital for a tender crust. This step is crucial for developing the characteristic crum extractbly texture. Once you have this crum extractbly mixture, take out approximately 1½ cups of it and set it aside in a separate bowl. This will be your topping. To the remaining crum extractb mixture in the large bowl, add the 1 egg and 1 tsp of vanilla extract. Mix until just combined and a dough begin extracts to form. It will be somewhat sticky.
2. Form the Base: Lightly grease a 9×13 inch baking pan. If you want to ensure easy removal and clean edges, you can also line the pan with parchment paper, leaving an overhang on the sides. Press the dough mixture evenly into the bottom of the prepared pan to form an even crust. You can use your hands or the bottom of a flat glass to achieve a smooth, compact layer. This base will bake for a bit before the filling is added, giving it a head start and ensuring it’s cooked through.
3. Prepare the Apple Filling: In a medium bowl, gently toss the 4 cups of peeled and diced apples with 2 tbsp of lemon juice. This prevents browning and adds a bright, zesty note. In a small separate bowl, whisk together the ½ cup of brown sugar, 2 tsp of cinnamon, and 1 tsp of cornstarch. The cornstarch acts as a thickener, ensuring your apple filling doesn’t become too watery. Sprinkle this sugar-cinnamon-cornstarch mixture over the apples and toss gently to coat them evenly.
4. Assemble and Bake the Bars: Spread the prepared apple mixture evenly over the pressed dough base in the baking pan. Make sure to distribute the apples and any accumulated juices. Then, take the reserved 1½ cups of crum extractb mixture and sprinkle it evenly over the top of the apple filling. This creates that irresistible streusel topping. Place the pan in a preheated oven at 375°F (190°C). Bake for 35-45 minutes, or until the topping is golden brown and the apple filling is bubbling around the edges. You want to see the filling cooked and slightly thickened.
5. Cool and Serve: This is perhaps the hardest part – waiting! Once baked, remove the apple pie bars from the oven and let them cool completely in the pan on a wire rack. This is essential for the bars to set up properly. If you try to cut them while they are still warm, they will likely fall apart. Once completely cooled, you can lift the bars out of the pan using the parchment paper overhang (if used) or cut them directly in the pan. Slice into squares and enjoy! These bars are delicious on their own, but are even more decadent served with a scoop of vanilla ice cream or a dollop of whipped cream. They store well in an airtight container at room temperature for a few days.
Conclusion:
And there you have it – a delicious and easy way to enjoy all the comforting flavors of classic apple pie, just in a more portable and shareable bar format! These Apple Pie Bars are truly fantastic because they offer that perfect balance of sweet, tender apples nestled in a buttery, crum extractbly crust. They’re ideal for picnics, potlucks, or simply a delightful afternoon treat without the fuss of rolling out pie dough. I hope you’ll give this recipe a try!
For serving suggestions, I love these bars warm, perhaps with a dollop of vanilla ice cream or a drizzle of caramel sauce. They’re also wonderful at room temperature, making them perfect for packed lunches or as a grab-and-go dessert. Don’t be afraid to experiment with variations! You could add a sprinkle of cinnamon or nutmeg to the crust, toss in some chopped walnuts or pecans with the apples, or even use a mix of different apple varieties for added complexity. The possibilities are endless, and I encourage you to make these Apple Pie Bars your own!
Frequently Asked Questions:
Can I make these Apple Pie Bars ahead of time?
Absolutely! These bars are excellent for making in advance. You can bake them up to two days ahead and store them, covered, at room temperature. If you live in a very warm climate, refrigeration might be best, but allow them to come to room temperature before serving for optimal texture.
What kind of apples work best for these bars?
For the best texture and flavor, I recommend using a mix of firm, tart apples like Granny Smith and sweeter apples such as Honeycrisp or Fuji. This combination provides a lovely balance of sweetness and a slight tang, and they hold their shape well during baking.
How long do these bars keep once baked?
Stored properly in an airtight container at room temperature, these Apple Pie Bars will stay delicious for about 2-3 days. If you refrigerate them, they can last a bit longer, closer to 4-5 days, but remember to let them warm up slightly before enjoying for the best taste and texture.
Apple Pie Bars
A delicious and easy-to-make apple pie bar recipe with a buttery crust and a sweet, cinnamon-spiced apple filling.
Ingredients
-
2½ cups all-purpose flour
-
1 cup granulated sugar
-
1 tsp baking powder
-
½ tsp salt
-
1 cup (2 sticks) cold unsalted butter, cubed
-
1 egg
-
1 tsp vanilla extract
-
4 cups peeled & diced apples
-
2 tbsp lemon juice
-
½ cup brown sugar
-
2 tsp cinnamon
-
1 tsp cornstarch
Instructions
-
Step 1
Preheat oven to 375°F (190°C). Line an 8×8 inch baking pan with parchment paper, leaving an overhang. -
Step 2
In a large bowl, whisk together flour, granulated sugar, baking powder, and salt. Cut in the cold butter using a pastry blender or your fingers until the mixture resembles coarse crumbs. -
Step 3
In a small bowl, whisk together the egg and vanilla extract. Add this to the dry ingredients and mix until just combined. Press about two-thirds of the dough evenly into the bottom of the prepared baking pan to form the crust. -
Step 4
In a medium bowl, toss the diced apples with lemon juice, brown sugar, cinnamon, and cornstarch. -
Step 5
Spread the apple mixture evenly over the crust. -
Step 6
Crumble the remaining dough over the apple filling. -
Step 7
Bake for 30-35 minutes, or until the topping is golden brown and the filling is bubbly. -
Step 8
Let cool completely before cutting into bars.
Important Information
Nutrition Facts (Per Serving)
It is important to consider this information as approximate and not to use it as definitive health advice.
Allergy Information
Please check ingredients for potential allergens and consult a health professional if in doubt.