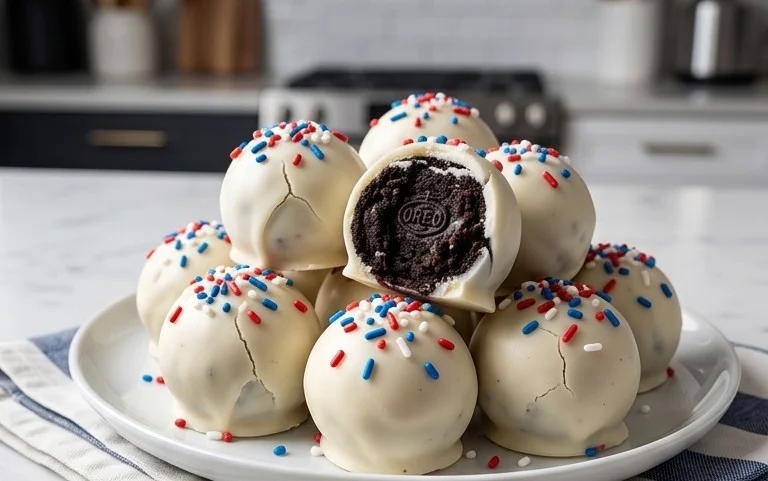
Patriotic Oreo Balls- Easy Red White Blue Treat Recipe
Patriotic Oreo Balls are the ultimate sweet treat for any celebration, especially when the red, white, and blue are flying high! These no-bake delights have captured hearts and taste buds for a reason: they’re incredibly easy to make, outrageously delicious, and undeniably festive. Imagin extracte biting into a creamy, decadent center, studded with crunchy Oreo cookie pieces, all enrobed in a smooth, vibrant coating. It’s a flavor explosion that’s both comforting and exciting, making them a guaranteed hit at summer barbecues, Fourth of July parties, Memorial Day gatherings, or simply when you want to add a splash of patriotic cheer to your day. What truly sets these Patriotic Oreo Balls apart is their versatility; you can customize the colors to match any occasion or just go all out with the classic red, white, and blue. Get ready to wow your friends and family with this simple yet spectacular recipe!
Ingredients:
Patriotic Oreo Balls: A Star-Spangled Treat
Get ready to celebrate with a treat that’s as delightful to look at as it is to eat! These Patriotic Oreo Balls are the perfect addition to any Fourth of July barbecue, Memorial Day picnic, or simply a fun way to add a burst of color and flavor to your day. The magic of Oreo Balls lies in their simplicity – a few key ingredients transform humble cookies into decadent, no-bake bites of joy. And when you infuse them with patriotic colors, they become an instant crowd-pleaser, embodying the spirit of celebration. This recipe is designed for ease, making it a fantastic activity for all ages, from seasoned bakers to kitchen novices. So gather your ingredients and let’s whip up some edible stars and stripes!
The foundation of these delightful treats is, of course, the beloved Oreo cookie. We’re using a substantial Family Size package, ensuring you have plenty to work with and to share. The cream cheese acts as the binder, a crucial component that softens the cookie crum extractbs and creates a dough-like consistency that’s easy to handle and perfectly rich. Then come the star performers for our patriotic theme: vibrant red and blue candy melts. These are incredibly user-friendly for dipping and coating, giving our Oreo balls a smooth, glossy finish. Finally, a touch of Ghirardelli white melting wafers adds a creamy sweetness and a beautiful contrast, perfect for drizzling or creating decorative elements. And for that undeniable patriotic flair, we’ll top them off with charming white star confetti sprinkles.
Preparing Your Patriotic Base
The first step in creating these delicious treats is to break down our Oreos into fine crum extractbs. You can achieve this in a couple of ways, depending on your kitchen equipment. The most efficient method is to use a food processor. Simply empty the entire Family Size package of Oreo cookies (filling and all!) into the bowl of your food processor and pulse until you have a fine, uniform crum extractb. It’s important to get them as fine as possible to ensure a smooth texture in your final Oreo balls. If you don’t have a food processor, don’t worry! You can achieve the same result by placing the Oreos in a sturdy zip-top bag, sealing it tightly, and then going to town with a rolling pin. It might take a little more effort, but the outcome will be just as delicious. Once you have your finely crushed Oreo crum extractbs, transfer them to a large mixing bowl.
Now it’s time to introduce the creamy element. Take your 8-ounce block of cream cheese, ensuring it has been softened to room temperature. This is a critical step; cold cream cheese will be difficult to incorporate and will result in a lumpy mixture. You can soften cream cheese by leaving it on the counter for about an hour, or for a quicker method, you can carefully microwave it in short 10-second bursts, stirring in between, until it’s pliable but not melted. Add the softened cream cheese directly to the bowl with your Oreo crum extractbs. Using a sturdy spatula or a wooden spoon, begin extract to mix the cream cheese and Oreo crum extractbs together. Continue to mix until they are thoroughly combined and a cohesive dough forms. It should be moist enough to hold together when squeezed but not overly sticky. If it feels a bit too dry, you can add another tablespoon of softened cream cheese; if it’s too wet, add a few more crushed Oreos.
Forming and Chilling Your Festive Bites
Once your Oreo and cream cheese mixture is well combined and resembles a dough, it’s time to shape your balls. You can use a small cookie scoop or a tablespoon to portion out the dough. Aim for balls that are about 1 inch in diameter. This size is perfect for dipping and eating in one or two bites. Roll each portion between your palms to form a smooth, round ball. As you form each ball, place them on a baking sheet lined with parchment paper. Parchment paper is essential here, as it prevents the balls from sticking to the baking sheet and makes for easy cleanup. Continue this process until all of your Oreo dough has been formed into balls. You’ll want to ensure each ball is fairly uniform in size so they all cook and coat evenly.
After all your Oreo balls are formed and nestled on the prepared baking sheet, they need a period of chilling. This step is crucial for firming up the balls, which will make them much easier to dip into the melted candy coatings. Place the baking sheet in the refrigerator for at least 30 minutes. You can even speed this up by placing them in the freezer for about 15-20 minutes, but be careful not to freeze them solid. The goal is for them to be firm enough to hold their shape when handled. While your Oreo balls are chilling, you can start preparing your dipping station and melting your candy coatings.
The Art of Dipping and Decorating
Now for the most visually exciting part: dipping and decorating! You’ll want to melt your red and blue candy melts separately. The best way to melt candy melts is in the microwave. Place each color in its own microwave-safe bowl. Microwave on 50% power in 30-second intervals, stirring well after each interval, until the candy melts are smooth and fully liquid. Be patient with this process; overheating candy melts can cause them to seize up. Once melted and smooth, you’ll also want to melt your Ghirardelli white melting wafers, using the same microwave method.
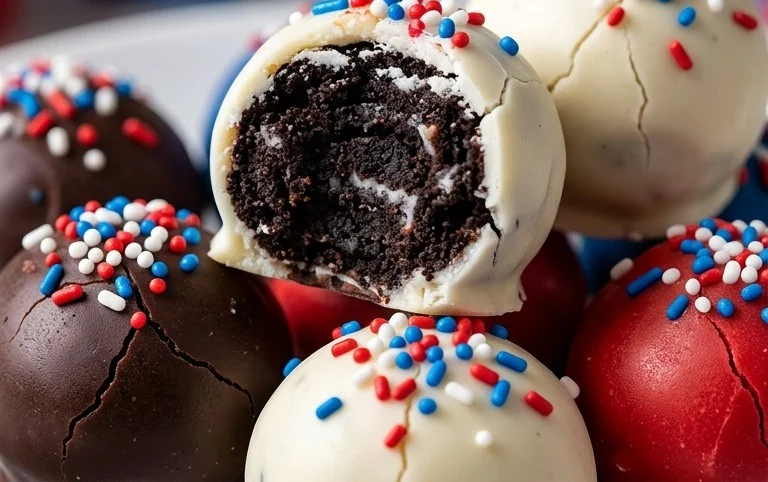
Dip your chilled Oreo balls into the melted candy coatings. You can choose to dip them entirely in one color, or get creative with a two-tone effect. For a patriotic look, consider dipping half of your balls in red and the other half in blue. To do this, use a fork or a dipping tool to carefully submerge about half of the Oreo ball into the melted candy. Gently lift it out, allowing any excess coating to drip back into the bowl. Place the dipped ball back onto the parchment-lined baking sheet. Repeat with the remaining balls, alternating colors as desired. For a seamless dip, ensure you coat the balls just below the halfway mark, then allow that layer to set slightly before dipping the other half in a different color, if you’re going for a bicolor look.
Once your red and blue dipped balls are set, it’s time to add the finishing touches. Melt the Ghirardelli white melting wafers. Use a spoon or a piping bag with a very small tip to drizzle the melted white chocolate over the red and blue dipped balls. You can create stripes, swirls, or random patterns – whatever strikes your fancy! Immediately after drizzling, while the white chocolate is still wet, sprinkle the white star confetti sprinkles generously over the tops of the balls. This is where the magic truly happens, transforming your simple Oreo balls into patriotic masterpieces. Allow the candy coatings and white chocolate to set completely at room temperature or in the refrigerator for about 15-20 minutes. Once hardened, your Patriotic Oreo Balls are ready to be devoured and admired!
Conclusion:
There you have it – your guide to creating these utterly delightful Patriotic Oreo Balls! These no-bake treats are an absolute winner for so many reasons. They’re incredibly easy to assemble, making them perfect for a fun family activity or a last-minute dessert when you need something festive. The combination of crushed Oreos and cream cheese, coated in vibrant red, white, and blue chocolate, creates a satisfyingly sweet and creamy bite that’s always a crowd-pleaser. They’re the perfect dessert for any summer celebration, from Fourth of July cookouts to Memorial Day picnics, adding a pop of color and flavor that’s sure to impress.
For serving, these Patriotic Oreo Balls are fantastic on their own, but they also look stunning arranged on a platter with other festive desserts. You can even pack them in small cellophane bags tied with red, white, and blue ribbon for adorable party favors. Feeling creative? Don’t hesitate to explore variations! Try adding a sprinkle of edible glitter for extra sparkle, or use different colored candies for the coating to match other holidays. The possibilities are truly endless. So, go ahead and give these Patriotic Oreo Balls a try – I promise you won’t be disappointed!
Frequently Asked Questions:
Q: Can I make these ahead of time?
Absolutely! These Patriotic Oreo Balls are perfect for making ahead. Once they’ve set in the refrigerator, you can store them in an airtight container at room temperature for a few days, or in the refrigerator for up to a week. They actually tend to taste even better after the flavors have had a chance to meld!
Q: What if I don’t have red, white, and blue candy melts?
No worries at all! You can use any color candy melts or even white chocolate and tint it with oil-based food coloring (water-based coloring can cause chocolate to seize). Alternatively, you could simply roll them in colored sprinkles or finely chopped nuts for a different, yet equally delicious, effect.
Patriotic Oreo Balls
Festive and easy-to-make Oreo balls perfect for any patriotic celebration. These no-bake treats feature a creamy Oreo filling coated in red and blue candy melts with white star sprinkles.
Ingredients
-
1 lb 2.12 oz Family Size package Oreo Cookies
-
8 ounce block cream cheese (softened to room temperature)
-
12 ounce bag red candy melts
-
12 ounce bag blue candy melts
-
⅓ cup Ghirardelli white melting wafers
-
White star confetti sprinkles for topping
Instructions
-
Step 1
Crush the Oreo cookies into fine crumbs using a food processor or by placing them in a sealed bag and crushing with a rolling pin. -
Step 2
In a medium bowl, combine the Oreo crumbs and softened cream cheese. Mix until well combined and a dough-like consistency is formed. -
Step 3
Roll the mixture into 1-inch balls and place them on a parchment-lined baking sheet. Chill in the refrigerator for at least 30 minutes. -
Step 4
Melt the red candy melts in one microwave-safe bowl and the blue candy melts in another, following package directions. Melt the white melting wafers in a separate small bowl. -
Step 5
Dip the chilled Oreo balls into the melted candy melts, coating them completely. For a layered effect, you can dip half in red and half in blue. Place back on the parchment-lined sheet. -
Step 6
While the candy coating is still wet, drizzle the white melted wafers over the Oreo balls and immediately sprinkle with white star confetti sprinkles. -
Step 7
Allow the candy coating to set completely at room temperature or in the refrigerator.
Important Information
Nutrition Facts (Per Serving)
It is important to consider this information as approximate and not to use it as definitive health advice.
Allergy Information
Please check ingredients for potential allergens and consult a health professional if in doubt.