American Flag Fruit Platter Idea Easy Recipe
4th of July Fruit Platter Idea | How to Make an American Flag – This year, let’s celebrate Independence Day with a dazzling and delicious creation that’s as patriotic as it is refreshing! Forget the same old sparklers and hot dogs; we’re bringin extractg a burst of vibrant color and natural sweetness to your holiday table with this show-stopping 4th of July Fruit Platter Idea | How to Make an American Flag. Everyone loves a fruit platter because it’s a healthy, crowd-pleasing option that’s perfect for sharing. But what makes this particular 4th of July Fruit Platter Idea | How to Make an American Flag so special? It’s the incredibly simple yet incredibly impactful way we transform fresh fruits into a edible masterpiece resembling Old Glory. It’s incredibly fun to assemble, guaranteed to wow your guests, and provides a light and healthy alternative to heavier holiday fare. Get ready to impress everyone with your culinary creativity!
4th of July Fruit Platter Idea | How to Make an American Flag
This year, let’s celebrate the Fourth of July with a vibrant and delicious treat that’s as beautiful as it is tasty. This American Flag fruit platter is incredibly easy to assemble, requires no cooking, and is always a huge hit at parties. It’s a healthy alternative to sugary desserts and perfectly captures the spirit of the holiday with its festive colors. Get ready to impress your guests with this patriotic masterpiece!
Ingredients:
Instructions:
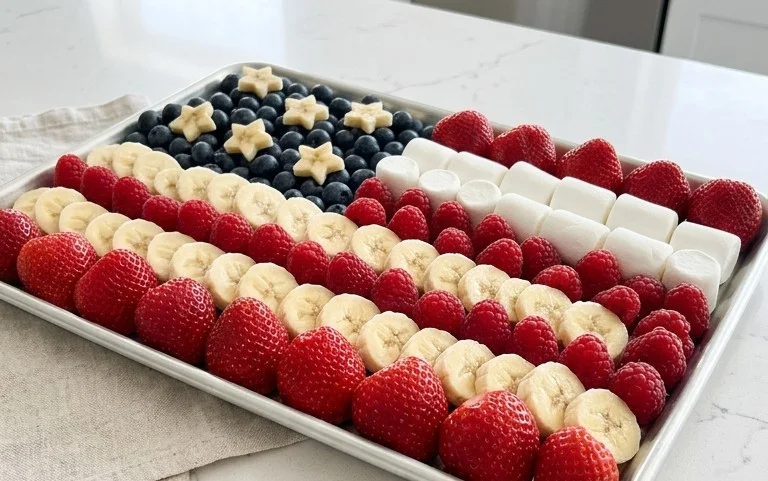
To create our stunning American flag fruit platter, we’ll be working in sections. The goal is to replicate the iconic stripes and the star-spangled blue field of the American flag using fresh fruit and our special pretzel “stars.”
Step 1: Prepare Your Base and “Stars”
First, select your serving platter. A large rectangular one works best to mimic the shape of a flag. If you don’t have a rectangular platter, a large cutting board is a fantastic alternative. Now, let’s get our “stars” ready. If you’re using white chocolate-covered pretzels, gently break them apart to create smaller, star-like pieces if they are too large. If you opt for yogurt-covered pretzels, do the same. We want them to resemble scattered stars. Set these aside. If you are using strawberries, wash them thoroughly and hull them. Cut larger strawberries in half or into quarters, depending on their size. If you are using watermelon, cut it into bite-sized cubes or fun shapes like stars using a cookie cutter for an extra festive touch. Ensure all your fruit pieces are roughly uniform in size for easier arrangement.
Step 2: Creating the Blue “Union”
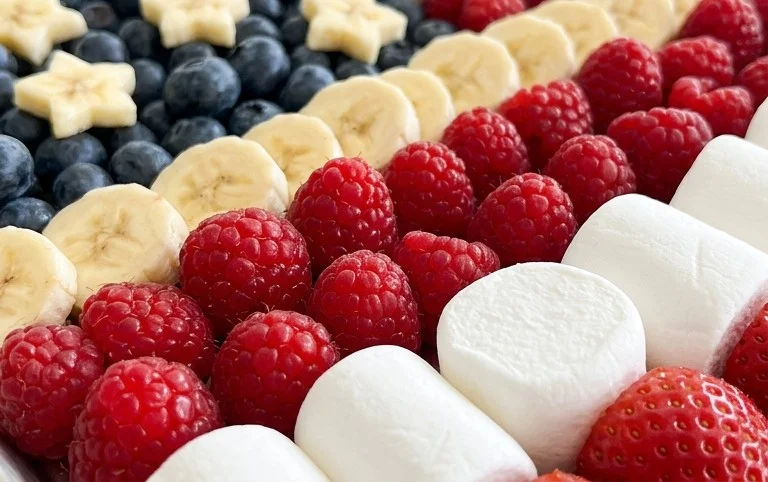
Now, we’ll create the iconic blue field of our flag where the stars reside. On the top left corner of your platter, arrange a generous layer of fresh blueberries. This area should be roughly a quarter of the platter’s surface, representing the Union. Pack them in snugly, creating a solid blue rectangle. You want this area to be dense with blueberries to give it a rich, deep color and a good base for our “stars.” If your platter has a slight lip, this will help contain the blueberries. Don’t worry if it’s not perfectly rectangular; a slight imperfection will add to the homemade charm. The key is to create a distinct block of blue.
Step 3: Adding the White Chocolate “Stars”
This is where the magic happens and our blue field truly comes to life! Gently scatter the prepared white chocolate-covered pretzel pieces over the blueberry “union.” Aim for a random, scattered pattern, just like the stars on the actual flag. You can place some pretzels slightly overlapping the blueberries, and others nestled amongst them. Don’t be afraid to use a good amount – the more “stars,” the merrier! The white chocolate coating will provide a lovely contrast to the deep blue of the blueberries and will be a delightful sweet crunch against the fresh fruit. If you find the pretzels are sticking too much, you can lightly dust them with a tiny bit of powdered sugar, but usually, the white chocolate is enough.
Step 4: Assembling the Red and White Stripes
Now, let’s move on to the stripes. Starting from the bottom edge of your platter, and extending upwards, we will create alternating red and white stripes. If you are using strawberries, arrange the cut pieces in neat, parallel lines. If you chose watermelon, use the cubed or cut-out pieces. Place your first “stripe” of fruit – let’s start with a red one. Arrange your strawberry or watermelon pieces in a long, straight line across the platter. Pack them closely together to create a solid stripe. Next to that, create a white stripe. If you’re using strawberries and watermelons exclusively, you might need to get creative for a white stripe. Sometimes, the natural white of the watermelon rind can be used if cut in specific ways, or you might consider adding thinly sliced white peaches or honeydew melon if you want to expand your fruit selection. However, for this specific recipe, if you used strawberries, you can create a white stripe by using the cut ends of strawberries, creating a lighter pinkish-white, or by leaving a gap. A simpler approach, if you have them, is to use banana slices for a white stripe, although they can brown quickly. For the most visually striking effect with the provided ingredients, let’s assume you are using strawberries and perhaps a small amount of watermelon for the red stripes and will be using the white chocolate pretzels to create the “white” spaces between some stripes if needed. Alternatively, if you are using watermelon, the pnon-alcoholic ale green rind can sometimes be cut into thin strips for a visual white effect. Let’s refine this: arrange a red stripe (strawberries or watermelon). Then, arrange a white stripe. This could be achieved with the white chocolate pretzels if you didn’t use all of them on the union, or by leaving a slight gap. Then, another red stripe. Continue this pattern until you reach the blue union. You should have approximately seven stripes in total, alternating red and white.
Step 5: Finishing Touches and Presentation
Once your stripes are laid out and the blue union with its stars is in place, step back and admire your handiwork! You want to ensure the stripes are distinct and that the blue union is clearly defined in its corner. If any fruit pieces have shifted, gently adjust them. The goal is a clean, defined flag shape. For an extra touch of patriotism, you could add a few extra stray blueberries around the edges of the blue section, or a few more pretzel stars scattered lightly. Serve this beautiful and refreshing platter immediately, or cover it loosely with plastic wrap and refrigerate for up to a few hours before your celebration. This American Flag fruit platter is a fantastic way to add a touch of festive flair to any 4th of July gathering and is sure to be a delightful and healthy centerpiece that everyone will enjoy.
Conclusion:
This 4th of July Fruit Platter Idea, a stunning and delicious American Flag creation, is truly a showstopper for any Independence Day celebration! It’s incredibly simple to assemble, making it perfect for cooks of all skill levels, and offers a healthy, refreshing alternative to traditional desserts. The vibrant colors and fresh flavors are guaranteed to be a hit with both kids and adults. Imagin extracte your guests’ delight as they approach this beautiful edible flag, bursting with juicy berries and creamy accents. It’s not just a dish; it’s a centerpiece that sparks conversation and festive cheer!
Serving this American Flag fruit platter is wonderfully versatile. It makes a fantastic appetizer while guests mingle, a delightful side dish alongside your barbecue favorites, or even a light and healthy dessert option. Feel free to get creative with your presentation; consider arrangin extractg it on a large rectangular platter or even a patriotic-themed serving board. For variations, you could swap the strawberries for raspberries or cherries, and consider using blueberries or blackberries for the stars. If you’re feeling extra ambitious, perhaps add a drizzle of yogurt-based ‘whipped cream’ for a creamy stripe! I wholeheartedly encourage you to give this recipe a try. It’s a fun, flavorful, and visually impressive way to celebrate the 4th of July!
Frequently Asked Questions:
Can I make this ahead of time?
Yes, you can! You can prepare the fruit components a few hours in advance. Wash and hull the strawberries, wash the blueberries, and slice any other fruits you might be using for the stripes. Store them separately in airtight containers in the refrigerator. Assemble the platter shortly before serving to ensure maximum freshness and visual appeal. The cream cheese or yogurt mixture is best made just before assembly.
What other fruits can I use for the stripes?
Absolutely! While strawberries are classic for the red stripes, you could also use raspberries or even sliced red grapes. For white stripes, bananas (tossed with a little lemon juice to prevent browning) or thinly sliced pears work wonderfully. Just ensure the colors offer a good contrast to create that distinct flag pattern.
How should I store leftovers?
Leftovers can be carefully transferred to airtight containers and stored in the refrigerator for up to a day. However, fruit platters are best enjoyed fresh. The texture of some fruits might change slightly upon refrigeration. You might find that the cream cheese or yogurt mixture is best separated and stored, then added back upon serving if there are significant leftovers.
4th of July Fruit Platter Idea | How to Make an American Flag
A festive and healthy American flag-shaped fruit platter perfect for your Fourth of July celebrations.
Ingredients
-
Strawberries cut into pieces
-
Blueberries
-
White Chocolate Covered Pretzels
-
Mini Marshmallows
-
Whipped Cream
-
Raspberries
Instructions
-
Step 1
Prepare your base: Arrange the sliced strawberries (or watermelon) in horizontal rows on a large rectangular platter to represent the red stripes of the flag. -
Step 2
Create the blue field: In one corner of the platter, create a rectangular area for the blue field. Place blueberries within this area. -
Step 3
Add the white stripes: For the white stripes, you can use mini marshmallows or arrange small pieces of white chocolate covered pretzels. Place these in alternating rows with the red stripes. -
Step 4
Form the stars: Use mini marshmallows or small pieces of white chocolate covered pretzels to create stars within the blue blueberry field. -
Step 5
Fill gaps and enhance: Use whipped cream to fill any gaps or add decorative swirls around the edges. You can also add raspberries to supplement the red stripes if needed. -
Step 6
Final presentation: Ensure the flag pattern is clear and appealing. Serve immediately.
Important Information
Nutrition Facts (Per Serving)
It is important to consider this information as approximate and not to use it as definitive health advice.
Allergy Information
Please check ingredients for potential allergens and consult a health professional if in doubt.